Showing posts with label Granny Square. Show all posts

Wednesday, December 3, 2014

Winter Bliss Square - Crochet Pattern

Winter Bliss Square by The Perfect Knot

Hello my Tangled Friends!

I know I have been MIA for several months now and I have definitely missed all of you!
Life gets in the way of play and sometimes you just have to put play on hold.

Anyway though... I'm BACK!!!!!!! And I have a goodie for you all to play with!

It's winter time in the US here and my brain is thinking "I want snow", while my body is going "Not yet!" LOL. So to fight the war between the two, I opted for Snow in Yarn! That way everyone wins and you can be warm while thinking cold. ;)

So without any further ado, here is the Free Pattern I promised you!
Enjoy and happy crocheting!

Michelle K
The Perfect Knot Crochet and More

Winter Bliss Square
This is an Intermediate level pattern written in US Crochet terms.

Materials Needed:
Size 4.0mm Crochet Hook                 
Tapestry Needle                                 Tape Measure
Scissors       
Size 4 Worsted Weight Yarn in 2 Colors (I used Red Heart With Love in my Example.)

Stitch Legend:
Ch – Chain                                        Sl St – Slip Stitch
SC – Single Crochet                          DC – Double Crochet
Trbl – Treble Crochet                        HDC – Half Double Crochet
FO – Fasten Off                                IJ – Invisible Join
St – Stitch                                          Sts – Stitches
[ ] – Stitches worked into the same space or Stitch
* – Repeat instructions from *

Special Stitches or Directions:
Triple Loop Start: Alternative to a Magic Circle that does not slide open like a traditional Magic Circle.

HOW TO DO A TRIPLE LOOP START: Wrap yarn around finger 3 times, insert hook under first 2 loops, catch 3rd loop with hook and pull through under the 2 loops on your finger. Once you pull the loop through, then you will begin your chain to secure the loops and start your first stitch. You will pull the tail of the yarn from the loop to close the loop tight. You may need to pull one strand of the loop & then the second strand of the loop so that you can fully close the yarn tail of the loop.

Your square should measure 6” when completed.

Let’s Begin!

Round 1: Begin with White yarn and a Triple Loop Start or a Magic Circle, Ch 5 (counts as 1st DC & Ch 2 space), Working all Sts into the loop, DC, Ch 2, *DC, Ch 2, Repeat from * 5 More Times & Sl St to the 3rd Ch of the beginning Ch 5 to join (8 DC & 8 Ch 2 spaces) Pull yarn tail to close loop
Round 2: Sl St into Ch 2 space, Ch 3 (counts as 1st DC), 3 DC in same Space, Ch 2, *4 DC in next Ch 2 space, Ch 2, Repeat from * around and Sl St to top of beginning Ch 3 to join (32 DC & 8 Ch 2 spaces)
Round 3: *Sl St into each DC to next Ch 2 space, Working in the Ch 2 space [Ch 3, Sl St in same Ch 2 space, Ch 5, Sl St in same Ch 2 space, Ch 7, Sl St in same Ch 2 space, Ch 5, Sl St in same Ch 2 space, Ch 3, Sl St in same Ch 2 space], Repeat from * around in each Ch 2 space, Sl St in 1st Sl St to join & FO White yarn (5 Ch space Cluster Petals in each Ch 2 space)
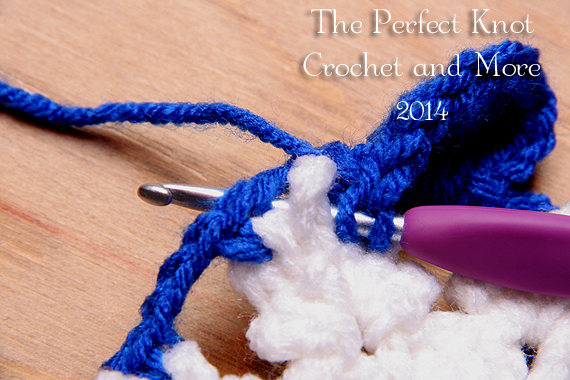
Round 4: Attach 2nd Color with a Sl St into the Ch 5 space on the left side of the 5 Ch space cluster petal (Right Ch 5 space if you are left handed) SEE PHOTO
Attach yarn here

Attach Yarn in the Ch 5 space indicated.
Ch 1, SC in same Space, *Ch 3, SC in next Ch 5 space on next petal, working behind Ch 7 space, Ch 3, SC in next Ch 5 space on same petal, Repeat from * around and Sl St to 1st SC to join (16 Ch 3 spaces, 16 SC)


Round 5 See Photo Tutorial Below if you have trouble with this round: Sl St into Ch 3 Space, [Ch 3 (counts as 1st DC), 2 Trbl, Ch 3, 2 Trbl, DC in same Space] corner made, *in next Ch 3 space DC, HDC in Ch 7 space at the point of the snowflake from Round 3 & around Ch 3 space from Round 4, DC in same Ch 3 space from Round 4, 3 HDC in next Ch 3 space, in next Ch 3 space DC, HDC in Ch 7 space at the point of the snowflake from Round 3 & Around Ch 3 space from Round 4, DC in same Ch 3 space from Round 4, in next Ch 3 space [DC, 2 Trbl, Ch 3, 2 Trbl, DC] corner made, Repeat from * around omitting last corner instructions, Sl St to top of beginning Ch 3 to join (60 Sts) 
After First Corner
After the first corner is formed you will be working into the Ch 3 space behind the point of the snowflake.


Make first DC into the Ch space BEHIND the point
Make the First DC into the Ch space behind the point.


Insert Hook Into the Ch 7 Space at the Point of the Snowflake


Make your HDC INTO the Ch 7 Space at the point of the Snowflake and insert your hook UNDER the Ch 3 space to complete the stitch worked Around the Ch space.


Finished HDC through the point should look like this
Your Stitch should look like this once completing the HDC through the point.


Make last DC into the Ch space behind the snowflake
Work the next DC into the Same Ch 3 space as the previous 2 stitches.


After Round 5 your square should measure 5”.

Round 6: Ch 1, SC in same St, SC in next 2 Sts to Ch 3 corner space, [2 SC, Ch 2, 2 SC] in Ch 3 corner space, *SC in next 15 Sts to next Ch 3 corner space, [2 SC, Ch 2, 2 SC] in next Ch 3 Corner space, Repeat from * to last corner, SC in next 12 Sts, Sl St to 1st SC to join (76 SC)
Round 7: Ch 1, SC in Same St, SC in next 4 Sts, in Ch 2 corner space [2 SC, Ch 2, 2 SC], *SC in next 19 Sts, in Ch 2 corner space [2 SC, Ch 2, 2 SC], Repeat from * to last corner, SC in next 14 Sts, Sl St to 1st SC to join, FO with an IJ and cut yarn tail (92 SC)
Using the tapestry needle, weave in your ends and discard remaining yarn tails.

Ta-Da! You’re finished!

© Copyright Michelle R. Kovach/The Perfect Knot 2012 - 2014. All rights reserved. All content & images in this pattern are protected under federal & international copyright laws. This is my original pattern. Do Not Copy, Modify, Reproduce, Redistribute, Sell or Claim as your own. You may sell items made from this pattern, but please Do NOT claim it as your own unique design. Please refer back to me as the original designer for any items you may sell. http://www.facebook.com/ThePerfectKnotCrochet  

Monday, June 9, 2014

Traditional Granny Square Modified

Traditional Granny Square

Traditional Granny Square Pattern

This is a modification of a traditional Granny Square pattern that will measure 6” and include a closed round of Single Crochet.

Many Charities I work with ask for a closed edge on the square so that it keeps an open-worked square from warping during the blanket assembly. This can be hard to accomplish if you do all Double Crochet for the pattern as it is traditionally written. I have created a slight modification of the square so that you can easily get a 6" square with a closed edge of SC on the last round & have a nice shaped square.
So let's begin!

Materials Needed:
Size 4.0mm Crochet Hook                                             Tapestry Needle    
Scissors                                                                                Tape Measure

Red Heart or other Worsted Weight Yarn of comparable size (I used Red Heart with Love in my example.)

Stitch Legend:
Ch – Chain                                                              Mgc Rng – Magic Ring
DC – Double Crochet                                           HDC – Half Double Crochet
SC – Single Crochet                                             Sl St – Slip Stitch
[ ] – Stitches worked into the same space
* – Repeat instructions from *                        


Begin:  Either Ch 4 & Sl St to join or use a Mgc Ring & pull the yarn tail closed after you finish the first round
Round 1: Ch 3 (Counts as 1st DC here and throughout), 2 DC, Ch 2, *3 DC, Ch 2, Repeat from * twice more, Sl St to top of beginning Ch 3 to join (12 DC)

Round 2: Sl St into next 2 DC & into the Ch 2 corner space, [Ch 3, 2 DC, Ch 2, 3 DC], Ch 1, *In next Ch 2 corner space [3 DC, Ch 2, 3 DC], Ch 1, Repeat from * twice more, Sl St to top of beginning Ch 3 to join (24 DC)

Round 3: Sl St into next 2 DC & into the Ch 2 corner space, [Ch 3, 2 DC, Ch 2, 3 DC], Ch 1, *In next Ch 1 space between clusters 3 DC, Ch 1, in next Ch 2 corner space [3 DC, Ch 2, 3 DC], Ch 1, Repeat from * twice more, Sl St to top of beginning Ch 3 to join (36 DC)

Round 4: Sl St into next 2 DC & into the Ch 2 corner space, [Ch 3, 2 DC, Ch 2, 3 DC], Ch 1, *In next Ch 1 space between clusters 3 DC, Ch 1, in next Ch 1 Space, 3 DC, Ch 1,  in next Ch 2 corner space [3 DC, Ch 2, 3 DC], Ch 1, Repeat from * twice more, Sl St to top of beginning Ch 3 to join (48 DC)

After this round your square should measure approximately 5”. Measure your square to be certain your measurements match.

Round 5: Sl St into next 2 DC & into the Ch 2 corner space, [Ch 2 (Counts as 1st HDC), 2 HDC, Ch 2, 3 HDC], Ch 1, *3 HDC in next Ch 1 space, Ch 1, 3 HDC in next Ch 1 space, Ch 1, 3 HDC in next Ch 1 space, Ch 1, in next Ch 2 corner space [3 HDC, Ch 2, 3 HDC], Ch 1, Repeat from * twice more, Sl St to top of beginning Ch 2 to join (60 HDC)

After this round your square should measure approximately 5.5”. Measure your square to be certain your measurements match.

Round 6: Ch 1, SC in same St, SC in next 2 HDC, in Ch 2 corner space [2 SC, Ch 2, 2 SC], SC in each HDC & in each Ch 1 space, in each Ch 2 corner space [2 SC, Ch 2, 2 SC], Repeat around, break off yarn & invisible join to 1st SC using the tapestry needle. (92 SC) 

Here is a tutorial for the invisible join http://www.youtube.com/watch?v=9jyT6Okd8LI


Use the tapestry needle and this method to weave in your ends to secure http://theperfectknotcrochetandmore.blogspot.com/2013/10/how-to-weave-in-your-ends-in-crochet.html  

Completed square measuring 6 inches


Congratulations! You have just completed a modified traditional granny square!

If your gauge matches correctly your square should measure 6" exactly. Depending upon how tightly or loosely you crochet, your measurements could vary slightly. It is always best to measure your square after each round to be sure your measurements are on target to hit your 6 inch size. :) You can adjust your hook & yarn size if necessary to meet the required 6 inch size.

Thanks for stopping by The Perfect Knot Crochet and More!

Enjoy your new pattern!

Have a great day!

Michelle K
The Perfect Knot

© Copyright Michelle R. Kovach/The Perfect Knot 2012 - 2014. All rights reserved. All content & images in this pattern are protected under federal & international copyright laws. This is my original pattern. Do Not Copy, Modify, Reproduce, Redistribute, Sell or Claim as your own. You may sell items made from this pattern, but please Do NOT claim it as your own unique design. Please refer back to me as the original designer for any items you may sell.

Friday, May 3, 2013

Getting it all Connected!


Friday's at The Perfect Knot are what I call "TGIF" days. TGIF stands for "Thank Goodness I FINISHED!" It's a fun little day where my wonderfully Tangled friends are welcome to show off their Finally Finished projects on the page. I love seeing all of their fun & creative projects that everyone has made!

Well today it's my turn to share with all of you!

Recently I shared with you the Sunflower blanket I was working on. (You can see the work in progress or WIP Here.)

80 Squares completed before joining


Well now it's made it to it's new home & I can share the joining & the final project with you!

It took me a little while to decide on a joining process. I tried a couple of different things & they didn't quite give me the look I was wanting. So I hit up google & Pinterest & eventually found something I liked that could work.

I decided on a slightly modifed version of this join from DROPS Design http://www.garnstudio.com/lang/us/video.php?id=175


Close-up of joining


Close-up of joining on vertical rows


80 Squares joined vertically


Close-up of sqaures joined both vertically & horizontally


Well, it took me about 3 days to get everything connected vertically & horizontally, but I finally got it all connected & done!


Here's the picture of all the squares connected before the border.

80 Squares joined both vertically and horizontally


Ahh the border or "hug" as my friend Pam calls it. I like that idea of calling it a Hug! It makes it feel like it has this great warm embracing feel to it & it just makes you want to wrap in the blanket & snuggle! It makes me smile to thing of that. :)

Again I tried a couple of different things that didn't work before I finally decided on something I liked.


I love texture & I love things that bring out the characteristics of the elements already in the design. So I finally decided to incorporate a similar pattern from one of my other patterns for the border.

I decided to brighten up the blanket a little bit so that it really popped but I wasn't sure what color. I eventually decided on the same yellow color as the Sunflowers with a little help from Pam.


Close-up of the Border detail
Well the math finally worked itself out and the texture was right and it looked like a great mimic of the joining. So I plugged along for 2 more days & finally got the rounds of the border completed! (YAY!)


The closer I got to finishing it, the more I realized I was both sad & happy to get it finished & have this project Finally completed.


Border detail
It's been a long journey to get it there, but it was finally finished & ready to go to her new home!


Finally DONE!
So here she is all completed right before I sent her out to her new home.
I completed her on April 30th, 2013.
She made it to her new home in TN on May 2nd.


You can see the pictures of her in her new home here at my friend Angie's.

It's been a fun ride in creating this blanket. I admit at times it was both fun & frustrating when my imagination didn't play out the way I thought it would or should, but the final product ended up being one that I am really proud to say I created!

I hope you've enjoyed watching the process of it all come together.
Thanks for sharing in my journey of creating!

Have a great day & God Bless!

Michelle K
The Perfect Knot Crochet and More