Monday, December 16, 2013

Simple Says It Best!

Simple Says It Best Square

SIMPLE SAYS IT BEST

I needed a really quick and easy closed weave square for some appliques and to use as solid color fillers in a blanket project.

I looked and looked and couldn't find exactly what I needed or wanted; so me being me and the designer that I am, I of course opted to make my own.
And of course I thought of all my Tangled Friends would probably like this pattern too, so I have written it out and am posting it here for all of you!

So without any further ado ... Drum roll please....

The Simple Says It Best 6 Inch Square! Ta da!


Simple Says It Best Square

This is an Intermediate level pattern written in US Crochet Terms.

Materials Needed:

Size 5.0mm Crochet Hook
Worsted Weight Yarn
Tapestry Needle
Scissors
Tape Measure

Stitch Legend:

Mgc Rng – Magic Ring
Ch – Chain
SC – Single Crochet
DC – Double Crochet
Sl St – Slip Stitch
St – Stitch
Sts – Stitches
* – Repeat Instructions between *’s
FO – Fasten Off
[ ] – Stitches worked in same Space or Stitch

Round 1: Begin with a Mgc Rng, Ch 3 (counts as 1st DC here & throughout), 15 DC into the ring, pull yarn tail to close & Sl St to top of Ch 3 to join (16 DC)

Round 2: [Ch 3, 1 DC, Ch 2, 2 DC] (corner made) into the same St as joining, *1 DC in next 3 Sts, [2 DC, Ch 2, 2 DC] in next St, Repeat from * around omitting last corner instructions, Sl St to top of Ch 3 to join (28 DC)

Round 3: Sl St into next St & into Ch 2 space, [Ch 3, 1 DC, Ch 2, 2 DC], *1 DC into each St across to corner, in Ch 2 corner space [2 DC, Ch 2, 2 DC], Repeat from * around omitting last corner instructions, Sl St to top of Ch 3 to join (44 DC)

Rounds 4 & 5: Repeat Round 3, after last Sl St on Round 5, Ch 1 & FO (Round 4 Count 60 DC, Round 5 Count (76 DC)

Using the tapestry needle, weave in all ends to secure & cut excess yarn.

Enjoy!

© Copyright Michelle R. Kovach/The Perfect Knot 2013. All rights reserved. All content & images in this pattern are protected under international copyright laws. This is my original pattern. Do Not Copy, Modify, Reproduce, Redistribute, Sell or Claim as your own. You may sell items made from this pattern, but please Do NOT claim it as your own unique design. Please refer back to me as the original designer for any items you may sell. http://www.facebook.com/ThePerfectKnotCrochet


Thursday, November 28, 2013

Happy Thanksgiving!


As many of you celebrate today with friends and family, enjoying wonderful food and fun.; I just wanted to take a moment to wish you all a Happy Thanksgiving and to say Thank you all for being a part of The Perfect Knot Crochet and More.

I am grateful to all who support me in this adventure and who encourage me to continue it.

It is a wonderful blessing to me and I am truly grateful to be able to share my creative outlet with all of you!

I am blessed with wonderful family and friends who enjoy and love what I do and who make my life extra special through this business! I am truly thankful for all of them and for all of you who follow my fan page and my blog.

I hope you all will take a moment to reflect and count your blessings and realize just how truly blessed we all are. There is always something to be thankful for!

I give thanks with a Grateful Heart for all of you!

I wish you all a Happy Thanksgiving and a wonderful Holiday season.

Happy Thanksgiving!

Michelle K
The Perfect Knot

Monday, October 14, 2013

How To Weave In Your Ends in Crochet

Weaving Ends Tutorial


One of the things I get asked about a lot is how to finish your project when you are done crocheting.
So I have decided to put together a photo tutorial for you here.

The worst thing that can happen to anyone's hard work is to have it fall apart because your ends were not woven in securely. Just crocheting over the yarn or using your hook to pull back through your work is not enough. Your ends will work loose or come undone when you wash the items or use them.

When you weave in your ends, it is always best to use a tapestry needle & not a crochet hook because you can get a much more secure weave with the needle.

I always leave at least a 4-6" yarn tail whenever I add new yarn or whenever I cut my yarn so that I have plenty to work with & that I can make sure all my ends are securely woven in when I finish my project.

I have found that the most secure method of weaving my ends in is an over & under type method. If you go Over & under then back over & under you will find that this creates a locking type method securing the yarn or thread in between the stitches of your work. You can use this method for all of your crochet projects when weaving in your ends.

The above photo shows weaving for a Magic Circle or adjustable ring. If you have used one of these you know that they slide around & allow you to pull your stitches around the piece of yarn to pull it closed. In the same manner though, they can slide around & come undone. If your ends are not woven in correctly though, your ring will come loose & your project can unravel from the middle out. EEEEEEK! No one wants that!

So the best way I have found to secure the Magic Circle is to weave over & under all the way around the circle in one direction with the tapestry needle. Then to weave back the other way all the way around the circle doing the same method.
Weave over & under back the other direction
This will make the center more secure & your yarn will not come undone.

I also take it a step or two further when I weave these Magic Circles because I definitely don't want my work to come undone! I weave in both directions as well as through the center in both directions of my work.

Weave back around all the way around the ring again
Catch the stitch after where you pulled your needle out when
you change directions


Be sure to weave around & around & back through the center of the Magic Circle in order to get everything nice & secure.


You always want to catch the next stitch in your work from where you stopped & pulled your yarn needle through so that it makes a sort of little lock down to hold the yarn in place when you weave back the other direction.

This will help to secure the yarn from both sides & keep those tails in nice & tight!


Weave through the back loops of the Stitches so your
weaving will not show through on the front of your piece

Remember Crochet stitches are sort of like hollow little tubes & if you catch the back loops of the stitches while you are weaving, your weaving will not show through on the front side of your work.
Be sure not to push too hard or poke your yarn needle through the front side of your work when you are weaving in as you want the front to stay pretty.


Pull yarn tail through to secure all Stitches when done
weaving in your ends.

When you get done weaving in your work, be sure to pull your yarn tail through with the needle to secure all the ends & cut the excess yarn from your needle as close to the fabric as possible.


Finished project with ends woven in securely
When you are done weaving in your ends your finished project should be nice & neat on the back & the front & all of your ends should be tucked down nice & securely so that your finished project will not come undone. :)


I hope you find this tutorial helpful!

Thank you for stopping by The Perfect Knot Crochet and More!

Have a great day!

Michelle K
The Perfect Knot


Thursday, September 12, 2013

Love, Compassion, Mission and Dedication - Join The Love


Do you have something that is very close to your heart that you put your crafting abilities into? I do.

I believe that God has given us all gifts and talents and ways to use them for a greater good.

One of my talents is my ability to crochet. I love it & most of all I love to be able to give back to others with this gift.

About a year & a half ago I became very heavily involved with a wonderful ministry called Join The Love. This ministry was started by some friends & myself after a very special friend lost her daughter.

A bunch of ladies who crochet, got together and all donated granny squares to help create a Personalized Memory Blanket in honor of this little girl. The squares incorporated her favorite things, colors, activities or things that reminded the mother of her daughter.
The response was so overwhelming & so many squares came in, & so many people asked how they could help.

After the blanket was completed there were many families asking where they could get a Memory Blanket for a child that they had lost. Very quickly it was obvious a need to be able to bless more families who had lost a child was there & in a short amount of time we were inundated with requests & knew we needed more help! There were so many grieving hurting families & we wanted to be able to bless each one in the same way we had blessed this first family.

So a small group of wonderful volunteers were assembled & as the requests came in we worked hard to create a group of global volunteers who's hearts were willing to help make the Memory blankets for these wonderful families. The group of volunteers has continued to grow & we continue to receive more and more requests from families who are nominated to receive one of these special Gifts in honor of a child that was lost.

With just a handful of less than 100 volunteers, we were able to make over 20 blankets in less than 1 year & in this year alone we have handled even more requests & have produced almost twice that number of blankets already, with more requests still patiently waiting! It truly is amazing to see what love pours out of these wonderful ladies who help to create these beautiful blankets!

We do not charge for our memory blankets & each one is produced solely by volunteers. Volunteers & other friends help us to fund our shipping costs, our assemblers yarn for joining & the memory booklets we create with the blankets. We create each blanket as a special gift for the families that are nominated. Not one person gets paid to be able create these beautiful blankets. Each one uses their time, talents, materials, supplies & shipping funds to bless one family without any thought of what they are actually giving of themselves! I have truly never met a more selfless group of people in my entire life & it truly blesses me each time I see a square being made.

Each blanket that is created is crafted with so much love, artistry, care, compassion, prayers & dedication in order to be able to create this beautiful treasure for one special family! Each project takes about 2 months to complete, but once it all comes together it truly is beautiful!

Each square is different & unique & the ladies who create them really do put all their hearts into each one to make them special. Things such as favorite colors, activities, cartoons, movies, family pets, special sayings, symbols, or other items that remind the family of their child are all incorporated into making the squares for each blanket.

Once all of the squares are collected, a volunteer assembles them all into one piece creating the blanket with their own special artistic touches into the blanket. You can really see the child's personality shine through in all of the squares combined to make the blanket!  It always amazes me how each blanket always seems to come together so beautifully & is a perfect symbol of love for each family to honor their child!

This ministry is very personal to me because I myself have been in the same situation as the families nominated for the Memory Blankets. I appreciate so much what these wonderful volunteers do & how selfless they are to give so much to these families.

I can tell you, that receiving a blanket brings so much joy & comfort to these grieving families! When you see all the notes & cards that are included with the squares sent for the blankets, & the memory book that the assemblers create, & how far & wide the squares have come from, its all just very overwhelming, beautiful and very emotional!

Below is more information about the Join the Love Ministry. If you are interested in any of the areas mentioned, please click through the appropriate link.

If you would like general information on the Join the Love ministry, you can visit the main page here:
Join The Love Main Page

If you would like to become a volunteer square maker to help create squares for this ministry, you can find out more information here:
How to Become a Square Maker

If you would know of a family who has suffered a loss of a child within the last 24 months & would like to nominate them for one of our Memory Blankets, you can find out more information here:
How to Nominate for a Join The Love Memory Blanket

All of our Memory Blankets are produced by volunteers, we are a totally non-profit organization & we do have our share of hard costs with each blanket. (It is estimated that it costs upwards of $600 to produce one blanket when we add up yarn costs to make each square, yarn costs to join the squares, shipping funds for each square, shipping funds for delivering the blankets, the cards, memory booklets, the assembler's time & so much more.)

If you are blessed enough to be able to help us in this ministry financially & would like to help support Join the Love in this way, you can find out more information here:
Supporting Join the Love

If you would like to see some of the finished memory blankets we have made, you can find more photos of the blankets here:
Finished Memory Blankets

Memory Blanket
This really is a very special ministry that Join the Love does & it has been a huge blessing to be such a big part of it. I am blessed every day by the love that this group produces!

I pray that it continues to grow & bless these wonderful families that are nominated & comfort them in their time of grief.

To some it may be just a small thing to make a granny square, but when they are all connected & joined together with love & prayers, to these families they mean the world!

Thank you for reading & for supporting the Join the Love ministry whether it is in prayers, squares, financially, nominations or in any other way possible.

Have a great day & God Bless!

Michelle K
The Perfect Knot


Monday, September 9, 2013

Uh Oh! She's at it again!

Rochelle's Geometric Knit Hat

Look out world! She's at it again!
Getting into something crafty and creative & loving every minute of it!

Okay I admit it. I am now "Bi-stitch-ual"! I can both Crochet & Knit! (Uh Oh! I can get into even more trouble now! LOL)

My grandma taught me how to do both when I was little but I loved crocheting so much more that I stuck with that over the knitting & I pretty well forgot everything I learned about knitting up until this point. It was the whole out of sight, out of mind, don't use it you lose it thing.

 Last year though I said I wanted to try it again & a few months ago my grandma gifted me all of hers & my mom's old knitting needles. When I say old, we're talking truly antique/vintage here, 60 years or better at least! It was pretty cool to see all of those antique needles & to find the gauge checker with my mom's maiden name on it for her grade 6 home economics class though. It truly felt like I had been gifted pieces of both my mom & my grandma. Pretty neat that she held onto them for all these years & now I have them again.

I had tried to knit last year & it didn't go over too well, so I set it down again. When my grandma gave me hers & mom's needles again though, I decided I would go ahead & pick it up again to give it another try.

Well like most things when I "play" I get an idea and I start working on something and before you know it I end up making up my own creation. The same was true in this case with this idea. So after a little bit of work, a little more trial and error, sorting it out after a few mistakes and after sending it to a round with my testers I now can present my FIRST Knit pattern!


When I got this idea, I knew exactly who I was going to be making it for & who was going to be the inspiration for this pattern. I just had to make it work because I knew it would be special to her. :)

I had so much fun coming up with this design! It incorporates all of my favorite things about fiber work! It has texture, color, interesting shapes, a beautiful design & a few other things you have to look for in order to see the surprises in your finished work! 

Best of all, I came up with this design especially for a wonderful friend & was able to gift the finished item to her & she loved it! That part always makes me Happy & I love it when my designs get to be loved by my friends & family!

So without any further ado, let me introduce you to the Rochelle's Geometric Knitted Hat!

 You can purchase the pattern in my Ravelry Shop and I have it introductory priced with a special coupon code for all my friends until 9-12-13.
Use code Knit1 & you will receive $2.50 off the total price.

This has been so much fun for me & such a wonderful adventure to branch out into this area of crafting again. I've had fun & I know that this will not be my only knit pattern, so stay tuned for more to come in the future!

Special thanks to all my testers who helped me get this pattern ready!
You can see more of their hard work here: https://www.facebook.com/media/set/?set=a.505143329575849.1073741841.282139305209587&type=1


Thank you for stopping by The Perfect Knot Crochet and More!
Have a great day!

Michelle K
The Perfect Knot

Sunday, August 25, 2013

Monkey Lovey


Announcing the newest member of my Lovey Patterns Collection! Meet the brand new Monkey Lovey!

This little guy is just to sweet not to cuddle!

His sweet little face just makes me smile right along with him!

I just listed this little guy in my Ravelry Store & for a limited time you can purchase the pattern for 50% off! Use coupon code Monkey50 (case specific) until 8-27-13 & receive 50% off the pattern!

Pattern includes detailed instructions, a photo tutorial & more!

I'd love to see pictures if you make your own, so be sure to let me know what you have created!

Thank you for stopping by The Perfect Knot Crochet and More!

Have a great day!

Michelle K
The Perfect Knot

Wednesday, August 14, 2013

Mango Chipotle Slaw

Mango Chipotle Slaw

Sometimes you just want something a little different when it comes to food!

Well, this recipe definitely qualifies as the "Different"! It is one of those things that the ingredients sound very unusual but it is a perfect mix of the savory & sweet that ends up being surprisingly delicious!

So without any further ado here is the recipe for Mango Chipotle Slaw...


Ingredients:
3 cups Cabbage or Cole slaw mix
1 Mango diced or julienne
6-8 pieces of Crispy Bacon cooked & crumbled into bits (Optional)
1/2 cup Kraft Mango Chipotle Vinaigrette Anything Dressing 
1/2 Tsp Garlic salt

Directions:
Wash & cut Cabbage or use ready made Cole Slaw mix.
Add Cabbage to bowl.
Dice or Julienne Mango into bite sized pieces.
Add Dressing & Garlic Salt.
Add Bacon Bits (optional)
Mix together in bowl & let chill in refrigerator for 1 hour before serving.

Makes 6 Servings.

Enjoy!

Michelle K
The Perfect Knot


Monday, August 5, 2013

Top Stitching Photo Tutorial and Goggle Guy Applique Pattern

Goggle Guy Applique

I do a lot of appliques for different things & I often get asked how I sew them onto my projects without them showing in the back.

Well, because it is a pretty commonly asked question, I thought I would go ahead & do a photo tutorial for you all & explain the process.

I will also be adding the pattern for the Goggle Eyes Applique at the end of the tutorial for you here, so stay tuned to the end of the post. ;)


Okay, so the really cool thing about Crochet is that the way the stitches are done there are 2 parts to the stitch where it actually makes sort of like a hollow tube & you can easily work between them if you know the technique.

When I was little & my grandma was teaching me to sew & crochet she would always tell me to "make it look pretty". So she showed me how you could stitch things to your piece without it showing through the back & making it look ugly. This technique is called "Top Stitching" & you can use it for anything you sew onto a Crocheted piece. You can also do the top stitching or top weaving method for embroidering details onto your piece without it showing through the back. (I did that for the mouth in this particular piece. I will cover that particular technique in another post at a later date.)

Anyway, let me explain how Top Stitching is done. I will post the photos here & walk you through the process.
For this tutorial, I just used a closed weave pattern basic 6x6" square to sew the appliques onto.


Whenever you do top stitching with your appliques I find it is best to leave a long yarn tail when you fasten off with whatever color you were working with so that your yarn matches the applique on the front & you do not see a different color around the pieces.

In this case you have 4 parts to the applique & 2 different colors of yarn that need to be matched.

I left about a 24" yarn tail for the grey where I had to go all the way around the eyes & about a 12" for the black where I would be stitching around the strap part.

Place your appliques on your piece where you want them. You can pin them to your piece from the back to hold them in place because you will be working from the front when top stitching your appliques onto your project.

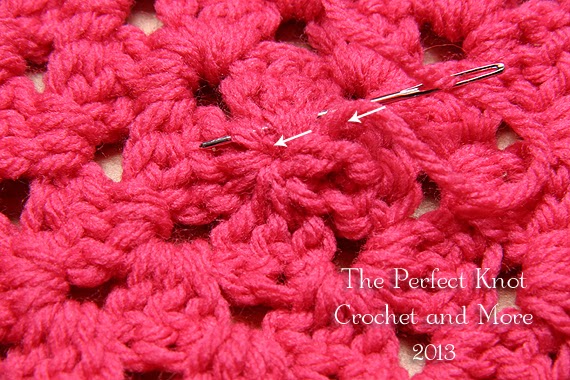
After you get your appliques placed where you would like them on your piece, then attach your yarn tail to your tapestry needle. You will be stitching from the front of your piece & going around the appliques. You will only be working through the top portion of the stitch so that your needle does not poke through the back side of your piece.


Separating the loops of your crochet stitches with the needle (try not to split the yarn when you do this) insert your needle into the top part of the stitch of the project you will be sewing to & then back into the applique from the back of the applique to the front.
You will be working in a whip stitching method in whatever shape your piece is.

You will continue the same process as above all the way around your piece until all of your pieces are connected to the final project.

Keep working with the color that matches the part of your applique until you get to the part where the color changes.

Weave your yarn tail behind the piece of the applique up to the point where you would change back to that color.


When you get to your second color that you need to stitch on, remove your needle from the first yarn tail & attach it to the second one.

Repeat the process of catching the top loops of the stitch & the applique until you finish with the secondary color.

Weave in the second color behind your applique when you are finished working with it & have stitched around the portion of your applique done in that color. Cut the excess yarn from that color & discard.
Reattach the needle to your first color again & continue stitching around the rest of your applique until you get the whole piece attached. Weave in your yarn tail under the applique without going through the back side & cut the excess yarn closely to your applique & discard excess yarn.

While you are stitching be sure to double check your work from behind to make sure none of the other colors have come through the back side of your project & are not showing through.


As you can see in this photo the yarn tails are still attached to my project & I have sewn around one part of the applique & none of the yarn is showing through on the back of the piece.

If you correctly do the top stitching you should have the same results where the back of the project is clean of other colors.


Here is the square with both Goggle eyes & straps attached before adding any further details.


Here is the back of the full square once both the pieces of the appliques have been attached with the Top Stitching & the embroidered mouth detail I did at the bottom. as you can see the square has no other colors on the back side of it.


And just so no one thinks I just took a photo of the back of the square before I stitched anything on, here is the same square with both parts of the appliques stitched on & folded in half. You can see a little bit of the second strap peeking through the back of the squares stitches if you look on the right of the photo. It's really sewed on there I promise! :)


Once again here is the finished project with all of the details stitched on for the mouth & the appliques.

Top stitching is a great technique for finishing your projects with appliques & it makes your finished project look nice & neat! No ugly backs of your projects if you can do the top stitching method & keep it nice & pretty!

I hope you've enjoyed & find this photo tutorial useful for all your applique projects!

Now as I promised... Here is the pattern for the Goggle Guy Appliques shown above! Enjoy & God Bless!

Thank you for stopping by The Perfect Knot Crochet & More!

Michelle K
The Perfect Knot


Goggle Guy Applique & Photo Tutorial

Beginner level pattern written in US Crochet Terms.

Materials Needed:

Size 4.0mm or other Crochet Hook

Worsted Weight Size 4 Yarn in colors Black, Brown, White & Grey (I used Caron Simply Soft in my example)

Tapestry Needle

Scissors

Stitch Legend:

Mgc Rng – Magic Ring

Ch – Chain

SC – Single Crochet

Sl St – Slip Stitch

DC – Double Crochet

St – Stitch

Sts – Stitches

* – Repeat instructions from *


EYES – Make 2

Round 1: Begin with black yarn & a Mgc Rng, 6 SC into ring, pull yarn tail to close & Sl St to 1st SC to join, Ch 1 & Fasten Off (6 SC)

Round 2: Attach brown yarn into any St with a Sl St, Ch 1 & 2 SC in same St, *2 SC in next St, Repeat around & Sl St to 1st SC to join, Ch 1 & Fasten Off (12 SC)

Round 3: Attach white yarn with a Sl St into any St, Ch 3 (counts as 1st DC), 2 DC into the next St, *1 DC into the next St, 2 DC into the next St, Repeat around & Sl St to top of beginning Ch 3 to join, Ch 1 & Fasten Off (18 DC)

Round 4: Attach grey yarn with a Sl St into any St, Ch 1 & SC into same St, 1 SC into each St around, Sl St to 1st SC to join, Ch 1 & Fasten Off leaving a long tail to sew.
Weave in your all ends except the 2 long grey yarn tails for sewing using the tapestry needle.

  
STRAPS – Can be made longer if you are using something other than a square for your appliques. Just repeat Row 2 until you reach your desired length for your project.

With your grey yarn tails centered at the bottom of your eye work the Straps as follows:

Right Strap –

Row 1: Count 4 Stitches up the right side from the grey yarn tail & attach black yarn with a Sl St & work up the side of the eye working away from the yarn tail towards the top, Ch 1 & 1 SC into same St, 1 SC into next 2 Sts (3 SC)

Rows 2- 4: Ch 1 & Turn, 1 SC into next 3 Sts (3 SC)
At the end of Row 4, Ch 1 & Fasten Off leaving a longer tail for sewing on the black pieces of the goggles to your piece.

Left Strap –
Row 1: Count 6 Stitches up the left side of the eye from the grey yarn tail & attach black yarn with a Sl St & work Down the side back towards the yarn tail, Ch 1 & 1 SC into same St, 1 SC into next 2 Sts (3 SC)

Rows 2- 4: Ch 1 & Turn, 1 SC into next 3 Sts (3 SC)
At the end of Row 4, Ch 1 & Fasten Off leaving a longer tail for sewing on the black pieces of the goggles to your piece.

Attach your pieces to your project using the top stitching method, weave in all your ends & cut excess yarn.
Embroider your mouth using a top stitching weaving method so your pieces don’t show on the back of your project.

© Copyright Michelle R. Kovach/The Perfect Knot 2013. All rights reserved. This is my original pattern. Do Not Copy, Modify, Reproduce, Sell or Claim as your own. You may sell items made from this pattern, but please Do NOT claim it as your own unique design. Please refer back to me as the original designer for any items you may sell. http://www.facebook.com/ThePerfectKnotCrochet


Friday, August 2, 2013

Mexican Night Leftovers Breakfast Burritos


My family loves Mexican food! We have at least one Mexican meal every week & the great thing is, there is always a little bit of the meat left over!

So whenever I can, I try to make a breakfast burrito the next morning. ;)

Here's a quick, easy & much cheaper (& healthier) than fast food recipe for you to enjoy too!


INGREDIENTS

1/8 to 1/4 Cup Leftover Taco Seasoned Ground Meat or Chicken
1 Egg
1 Small Soft Tortilla (Flour, corn, wheat or whole grain)
1/8 Tsp Cilantro
1/8 Tsp Dried Minced Onions
1/8 Tsp Lawry's Seasoned Pepper
1 Tbsp Shredded Mexican blend Cheeses
2 Tbsp of Your Favorite Salsa

DIRECTIONS

In small pan spray some non-stick cooking spray & use a medium heat. Add Egg, Cilantro, Minced Onion, & Lawry's Seasoned Pepper. Scramble egg & cook until done.
Add Warm Meat, Egg & Cheese to Tortilla, let Cheese melt slightly & add Salsa. Wrap up in a burrito & eat.

Great for breakfast on the go or eat it at home!


You're on your way to a great day with a quick healthy starting breakfast!

Enjoy!

Michelle K
The Perfect Knot


Wednesday, July 24, 2013

Summer Fun Sale on Ravelry!


 Announcing the Summer Fun Sale going on Now in my Ravelry Shop until 7-31-13! No Coupon Code required, Discount applied in cart!

I'm excited about the newest patterns I've added to my shop & I hope you will all stop on by & check them out!

Here's some samples of the newest pretties now available!

Piggy Lovey


Fancy Schmancy Cuffs
Campfire The Mini Marshmallow (PSSST! He's a Freebie!)


Enigma Solved Thread Bracelet


Summer Delight Thread Bracelet


Thanks for stopping by The Perfect Knot Crochet and More!

Enjoy all the new pretties!

Michelle K
The Perfect Knot

Saturday, July 20, 2013

Summer Berry Parfait Recipe

Summer Berry Parfait

Summer gives us a beautiful harvest of many wonderful fresh fruits & veggies!

I love it when all the Strawberries & Blueberries are just at that perfect flavor & ripeness.

One of my favorites for breakfast in the summer (or any time I can get it) is something quick, healthy & easy that incorporates all those perfect summer berries!


I thought's I'd share the recipe with you all & let you enjoy the deliciousness too!

Summer Berry Parfait Recipe

Ingredients:
4-6 Fresh Strawberries
1/4 Cup Fresh Washed Blueberries
1/2 Cup Low Fat Vanilla or Plain Yogurt
2 Tbsp All Natural Granola
Sprinkle of Cinnamon

Wash & slice Strawberries. Wash Blueberries. Add yogurt to bowl, layer in Strawberries & Blueberries, top with Granola & sprinkle Cinnamon over the top. Ta-da Done!
Spoon, eat & enjoy!

Thank you for stopping by The Perfect Knot Crochet and More!

Enjoy the Summer Berry Parfait!

All the best,

Michelle K
The Perfect Knot

Thursday, July 18, 2013

Enigma Solved!


Several years ago I found this photo of a beautiful crocheted bracelet online that I absolutely fell in love with. The photo was small, the quality wasn't that great & there was no pattern that went with it & no way to find out who had posted the photo. The image had stayed online in a search, but the website had been abandoned & taken down. *Sadness*
I have never fallen in love with something crocheted like it before & for almost 2 years I tried to figure out something similar on my own. I stared at it for hours & hours, days & days! I tried several attempts over the last couple of years to “recreate” something similar & a few times I came close but could never quite figure out “exactly” how it was done. It puzzled me & puzzled me & I could never get it to look the way I wanted & after many failed attempts I finally gave up & said it was just not meant to be.
Then one day recently, I happened to be reorganizing my room & I found the binder I had kept of things I had loved or that were just pictures for inspiration. And lo & behold the photo of the bracelet I had found a couple of years ago was in the folder! I pulled it back out & started staring at it again.
My brain started working like crazy & all of a sudden something clicked! 
I thought, “It really can’t be as simple as all of that, can it?” LOL 
So I played around with an idea & kept working with it. I tried it in a shorter version first to see if my idea would work or not. The idea worked & then all of a sudden so did the math to make it happen & before I knew it, I had a pretty close recreation of what I had in the picture! Finally the Enigma was Solved!(I love it when something just clicks & it all works out!)
I started writing & working as fast as I could & before I knew it I had the pattern all worked out & ready to send to my testers! I was so excited that I couldn't wait to share it with them & with everyone else.
So now I can finally share with all of you both my results & their's! 
Enjoy!
TESTERS PHOTOS


Jan R


Thanks for coming with me on my journey to solve the Enigma!

Michelle K 
The Perfect Knot

Monday, July 1, 2013

100! Yeah baby!


HOLY MOLY MAMMA! The Perfect Knot just hit a major milestone in my pattern store on Ravelry!

I just listed my 100th Pattern in my pattern shop there!
Woo hoo! Time to celebrate!

Hard to believe its only been since last April that I actually started writing them down & listing them for sale! It is very hard to imagine that at all, but wonderful to say the least!

I want you all to Celebrate with me in reaching this milestone, so from 7-2-13 until 7-8-13 ALL 100 PATTERNS in my Ravelry Shop will be 50% off! No coupon code required, discount applied in cart.

Thank you all for your love & support! It means the world to me.

Have an amazing day!

Michelle K
The Perfect Knot Crochet and More

Friday, May 31, 2013

Pan-seared Chicken Spinach Salad... YUMMY!

 
Pan-seared Chicken Spinach Salad

I love to cook! Even more importantly I LOVE to eat too! LOL

I love it when the weather gets warmer and all of the fresh fruits & veggies are available, and a summer time salad is one of my absolute favorites! Either getting the vegetables fresh from the garden or the local farmer's market just makes it feel like Summer to me. :)

Anyway, today I thought I would share one of my favorite fast easy lunches (or dinners) with you all.


This one is a really simple salad recipe that is fast, healthy and delicious!


Pan-Seared Chicken Spinach Salad

Ingredients: (I did it for one person but you can modify it for more.)

1 Cup Fresh Baby Spinach Leaves (Washed)
1 4oz Thin Sliced Chicken Breast
1 Celery Stalk
1 Roma Tomato
1 Tsp Olive Oil
Parmesan Cheese
Salt
Pepper
McCormick's CA Garlic Salt
Spice Depot Jojo Potato Seasoning (I can usually find this at our local Big Lots.)
Balsamic Vinaigrette Salad dressing

Wash Spinach leaves & place in a bowl. Set aside for later.

Add olive oil to pan & heat oil on medium-high heat.

Once the pan is hot, add salt & pepper to Chicken breast & pan sear on one side for about 2 minutes or until you see the chicken starting to brown slightly in color.

Flip chicken over in pan & sear on other side. Sprinkle Garlic Salt & Jojo Seasoning over chicken & turn over, repeat for other side after cooking a couple minutes.

When chicken is cooked remove from pan & let rest 5-10 minutes so the juices all settle back into the chicken.

Dice your tomato & celery & add to your spinach leaves.

Once your chicken breast has rested, dice chicken into bite-sized pieces & add to the spinach mixture. Sprinkle Parmesan cheese over top of salad & add a drizzle of Balsamic Vinaigrette to finish off.

Tada! That's it! A quick, healthy & delicious salad that is perfect any time of year!

Enjoy!

Michelle K
The Perfect Knot

Saturday, May 18, 2013

Beads, Strings and Other Things


I've always been into crafts for as long as I can remember. I think I got part of it from my grandmother who was always knitting, crocheting or making something else useful, cute or out of necessity.


I learned to crochet at about 6 years old but didn't really pick that up more seriously until I was out of college, but I always needed something to do and to keep my hands and my brain busy.

As a kid I did painting, drawing, sculpting, floral arranging, paper crafts, macrame, lanyards, clay, beading, loom weaving, sewing, cross stitch, jewlery making and more. I've carried many of these crafts into adulthood and still enjoy some of the things I did when I was a child.

Last year, I made a resolution to try something new as often as I could whether it was crochet stitches, craft project, re-learning knitting (Still working on that one), more types of jewelry making or whatever. I just wanted to learn & try something new as often as I could.

So in August sometime I believe it was, I was just browsing around the internet and I saw a picture of a beautifully woven bracelet with this really neat pattern and the photo said "Kumhimo bracelet" under it. I had never heard of it but I definitely thought it was cool! And it looked like something I DEFINITELY wanted to try!

So I began to investigate. I searched google, youtube, pinterest and more just trying to learn what it was & how do you do it. I found this video on youtube for the basic spiral braid & it didn't look too terribly difficult and the supplies were simple looking enough, just a little slotted disk and some strings. So I found the supplies I needed and set about learning how to do Kumihimo.

Sounds simple enough doesn't it? LOL Well the basic part was simple enough, but little did I know that this artform had been around for many many years in Asia & in other countries & there were literally THOUSANDS of patterns, tools, methods and more! This is literally one of those artforms that kind of reminds me of poker where as the basics take 5 minutes to learn, but the true "ART" aspect of it takes years to master! The worst and best part is... It's Addicting & FUN! LOL

I have barely scratched the surface of this artform and I am still learning lots of different aspects of it, but I am definitely having fun in the process!

My favorite part of it is the jewelry aspect of because it fits in with other jewelry items that I make and gives me a new spin on things there, but there are some really amazing pieces and patterns out there that can be made from it! My favorites are the Beaded Kumihimo pieces right now. The possibilities are endless and they all work with the same basic principals as explained in this video here.

I've joined a couple of Kumihimo groups online and some of the work, the patterns, the materials and tools used in making these Kumihimo pieces just astounds and amazes me!

Each braid is unique & beautiful in it's own right, but some of these patterns and creations just literally blow my mind! I just can't believe that they can make some of them! Don't believe me? Just do a google or other search for "Kumihimo" and you will be quite surprised at what you see. :)

Someday I might get into the more technical aspect of things and possibly invest in the other more elaborate equipment you can use to make Kumihimo pieces, but for now, I'm happy with my little $2 foam disk and with what I have learned and am still learning so far.

It's a fun craft and if you are looking to try something new, this one is a great one and it doesn't cost that much to get started!

If you would like to see some of my Kumhimo pieces, you can check out more here on my Facebook page.

Also, if you do Kumihimo and would like to share, I'm always happy to see what other's have made. You are welcome to share on my page or link in the comments here.

Have fun & happy braiding!

Michelle K
The Perfect Knot


Friday, May 17, 2013

Here's a Sneak Peek from this week

I've been on a little bit of a creative kick lately & just trying to get out some of the ideas I have in my head in either yarn, thread, string, beads or whatever.

This week I sent off 3 new patterns to my Testers to play with & with any luck I should have them all in my shop very soon!

Here's a sneak peek of what is coming! I hope you all enjoy. I will let you know when everything is available. ;)

Froggy Lovey


This cute little Froggy needs some love! Hopefully you can make him your new friend soon!


Criss-Crossed Mesh Beach or Market Tote


I need a day (or a week) at the Beach! This fun & colorful textured mesh bag is perfect for all your beach day goodies.


Camel Back Coin Purse


I'm always having to dig for change at the bottom of my purse, so I figured I'd make a cute little coin purse to store all my change in. I love this one! It's got a great woven crochet stitch that looks like it was knitted! No holes, so nothing falls out!


I hope you all enjoyed the Sneak Peek from this week! I'll keep you posted as to when everything is available!
 
Have a great day everyone!
 
Michelle K
The Perfect Knot