Showing posts with label Crochet. Show all posts

Monday, August 10, 2015

Where Has The Perfect Knot Been?

Where has The Perfect Knot Been?

So where has The Perfect Knot Been???
Well, if you follow my Facebook Page you know that it's been pretty quiet lately and I have been a little MIA.
There are good reasons for that though and I truly do appreciate all of you who have asked when I was coming out with new patterns, what I have been working on, and where I've been. You made feel good to know that you did notice that I wasn't around as much. :)

Well the fact of the matter is that I had to take some time away from the Crochet and Knit world in order to work on some other things.

Last year, I was diagnosed with some pretty challenging health issues and I knew I needed to make some changes and adjustments if I was going to overcome them and be healthy.

In July of 2014 I found myself at a very unhealthy weight of 225 lbs, and having issues with my thyroid, adrenal glands and several other things. I've chosen to write my story out for you all to read so you can see where I've been and what I have done over the last year.

So here we go! *Eeek!* Here are my before pictures in all my rolly glory LOL. :p I'll be honest and say I hate the way I look and I remember how poorly I felt here. They definitely aren't pretty, but hey, they are part of the process and I can proudly say this is no longer the way I look today. We all have to start somewhere right? ;)


Anyway, I knew I needed to make a lifestyle change in order to overcome some of my health issues. I set out to create a plan to basically reinvent myself and work towards a healthy lifestyle. I knew it couldn't be a "Diet" or I would fail at it just like I had every other time I had tried one.

So I did my homework and my research and I decided the best way for me to go about it was through proper nutrition, clean eating (no junk or gimmicks), portion control and exercise. (Lots and lots of exercise! LOL) I needed a plan that I could realistically do for the rest of my life because after all, it was meant to be a Lifestyle and not just a diet.


So where to begin?

I knew I had to start with food. I had to get the proper nutrition involved in order to fuel my body. Very quickly one of the things I discovered was that I was an under eater. Now you'd think that you would lose weight by under eating, but nope, you can gain weight because you aren't eating enough too. Your body goes into a starvation mode and starts storing whatever it can get because you are not eating enough and you gain weight. My life was so crazy running around taking care of my mom and my family, that if I ate twice a day, I thought I was doing great. Nope. Not quite. ;)

I had to learn how to eat more, and not only eat more, but eat more of the Right things in order to fuel my body. I had to learn what portion sizes were, I had to learn what foods helped my body and what foods didn't help it or caused it to work slower. I went back to my old college days and my nutrition classes and started pulling those memories back to the front of my mind and applying them to my life now.  I cut out processed foods and sugars as much as I could, I limited my gluten intake (hypothyroidism recommends that as part of the treatment plan), and I started eating whole and unprocessed food. Eating Clean as they call it.

Along the way I discovered some very useful tools to help me keep track of my food intake and nutrients, as well as foods I really liked and could not feel deprived on. I seriously eat more now than I ever did on any "Diet" I was ever on and I never feel deprived or like I am starving hungry! (You should see how much I eat! LOL)

Through this whole process, I have not deprived myself of any foods. I just learned to make good choices and what portion sizes were. Yes, it is okay to splurge once in a while, but I try to stick to an 80/20 rule and eat clean 80% of the time at least. ;)

Now for the next part once the food was in place.

Goals.

You need to have goals and you need to write them down! I set a realistic goal of losing 50 lbs in 1 year and having my target be a 1 lb a week loss. You have to be realistic! It's a marathon to lose weight, not a sprint! Don't expect to lose 5 lbs a week, because in most cases, it's just not going to happen! You may see a huge jump in your loss at the very beginning, but it usually tapers off and a 1 lb loss is usually the average on most nutrition programs.

I set tons of small goals along the way and every time I got to one on my list, I could check it off and work towards the next one. Like I said, be realistic and set both small short term ones and some bigger long term ones. Set goals both on and off the scale and do rewards (other than food) for things once you get to a certain goal. It can be simple stuff, or it can be big stuff, but set them out on paper so you can work towards them. :)

Exercise. 

I used to grimace when I'd say that word before because most of it wasn't fun, it was hard work and I can safely say, I hated being sore afterwards. That is so not the case now, but a year ago, yes that was my attitude about it! LOL

So where to begin? I literally started with a 5 minute video on YouTube for exercise and I figured I could work my way up from there. Now you may think that 5 minutes is barely anything, and yes in most cases it is, but when you haven't worked out in 2 years plus and you're 75 + lbs over weight, completely out of shape and have asthma on top of it, trust me, that 5 minutes felt like I was going to die! LOL

I worked my way up though and I did 10 minutes, then 15 minutes, then 20 minutes and I finally found a program that was 25 - 30 minutes that I really enjoyed and I knew I could stick with it. One of the things I would strongly recommend is finding exercise that you personally enjoy! If you enjoy it, you are much more likely to do it and stick with it. It becomes fun and much less like work.


Did you want to Quit?

Yes, there were a million times I wanted to quit. I think that's normal. Everyone at some point, wants to quit. Especially when you are working your butt off and you don't see the results you want to. Do yourself a favor though, and don't just rely on the scale and most importantly, don't quit!


Plateaus happen.

And for me they have happened several times on my journey. For 3 months at one point I got stuck at one weight, but I don't just rely on the scale, because that is not the only place I see results. I measure with a tape measure, and I use a body fat percentage caliper. In that 3 month period, even though the scale wasn't budging, I was still seeing changes in inches and things toning up. I actually lost enough inches to drop an entire size without dropping a pound. Try your hardest not to get discouraged and just keep going! With a few modifications the plateau will usually break and things will start moving again. Just keep at it! Make adjustments and things will change.

One of my favorite quotes is "Success comes in Can's not Cant's" and a big part of losing weight is to tell yourself you Can do it! You really can if you believe you can and if you are willing to do the work necessary to transform yourself!

So Where am I at today?

Well, last Monday (8-3-15) I actually hit my first big milestone and checked off my goal of losing 55 lbs and this is what I look like now! Not even close to the same person I was a year ago!


I'm not finished yet though, so don't enjoy these images for too long because I am not at my final destination. This is just a progress point, and I have to keep going! I still have another 20 lbs to lose before I get to my next reassessment goal. Hopefully in the next 6 months or so, I can show you all those pictures and use these as my comparison pictures. :) I'm determined to get there and I know at some point I will!

Why did I write all of this?

Well, it's pretty simple actually. One, I wanted to encourage any of you who might be thinking about starting your own weight loss journey and tell you, that yes it's going to be a lot of hard work, but yes, You Can Do It! You just have to start. Don't do it alone, find support where you can. If you want to know about some amazing support systems that I have found, just message me and I will be happy to share them with you. (All are free and very beneficial.)

Two, I did this to document not only for you how far I've come, but also for myself. So I can look back on this and see where I have been and where I will be heading next. It's an amazing thing to know you can succeed at something if you set your mind to it and work hard to achieve your goals! Yes, it took me a year to get here, but I did it and I am very proud of that!

I know someone out there is in the same boat I was a year ago and I can only hope by reading this, that they will know there is hope and there is a way to overcome your health issues and live a better life! You can change your own life with just a few simple changes!

Thank you for sharing in my journey and for reading my blog! If you have any questions, please feel free to ask.

I wish you all much health and success!

Thanks for stopping by The Perfect Knot Crochet and More!

Much love and God Bless,

Michelle K
The Perfect Knot


PS. Yes, I will be back to playing with my yarn soon enough! ;) Winter is coming and I have presents to make! :)

Wednesday, December 3, 2014

Winter Bliss Square - Crochet Pattern

Winter Bliss Square by The Perfect Knot

Hello my Tangled Friends!

I know I have been MIA for several months now and I have definitely missed all of you!
Life gets in the way of play and sometimes you just have to put play on hold.

Anyway though... I'm BACK!!!!!!! And I have a goodie for you all to play with!

It's winter time in the US here and my brain is thinking "I want snow", while my body is going "Not yet!" LOL. So to fight the war between the two, I opted for Snow in Yarn! That way everyone wins and you can be warm while thinking cold. ;)

So without any further ado, here is the Free Pattern I promised you!
Enjoy and happy crocheting!

Michelle K
The Perfect Knot Crochet and More

Winter Bliss Square
This is an Intermediate level pattern written in US Crochet terms.

Materials Needed:
Size 4.0mm Crochet Hook                 
Tapestry Needle                                 Tape Measure
Scissors       
Size 4 Worsted Weight Yarn in 2 Colors (I used Red Heart With Love in my Example.)

Stitch Legend:
Ch – Chain                                        Sl St – Slip Stitch
SC – Single Crochet                          DC – Double Crochet
Trbl – Treble Crochet                        HDC – Half Double Crochet
FO – Fasten Off                                IJ – Invisible Join
St – Stitch                                          Sts – Stitches
[ ] – Stitches worked into the same space or Stitch
* – Repeat instructions from *

Special Stitches or Directions:
Triple Loop Start: Alternative to a Magic Circle that does not slide open like a traditional Magic Circle.

HOW TO DO A TRIPLE LOOP START: Wrap yarn around finger 3 times, insert hook under first 2 loops, catch 3rd loop with hook and pull through under the 2 loops on your finger. Once you pull the loop through, then you will begin your chain to secure the loops and start your first stitch. You will pull the tail of the yarn from the loop to close the loop tight. You may need to pull one strand of the loop & then the second strand of the loop so that you can fully close the yarn tail of the loop.

Your square should measure 6” when completed.

Let’s Begin!

Round 1: Begin with White yarn and a Triple Loop Start or a Magic Circle, Ch 5 (counts as 1st DC & Ch 2 space), Working all Sts into the loop, DC, Ch 2, *DC, Ch 2, Repeat from * 5 More Times & Sl St to the 3rd Ch of the beginning Ch 5 to join (8 DC & 8 Ch 2 spaces) Pull yarn tail to close loop
Round 2: Sl St into Ch 2 space, Ch 3 (counts as 1st DC), 3 DC in same Space, Ch 2, *4 DC in next Ch 2 space, Ch 2, Repeat from * around and Sl St to top of beginning Ch 3 to join (32 DC & 8 Ch 2 spaces)
Round 3: *Sl St into each DC to next Ch 2 space, Working in the Ch 2 space [Ch 3, Sl St in same Ch 2 space, Ch 5, Sl St in same Ch 2 space, Ch 7, Sl St in same Ch 2 space, Ch 5, Sl St in same Ch 2 space, Ch 3, Sl St in same Ch 2 space], Repeat from * around in each Ch 2 space, Sl St in 1st Sl St to join & FO White yarn (5 Ch space Cluster Petals in each Ch 2 space)
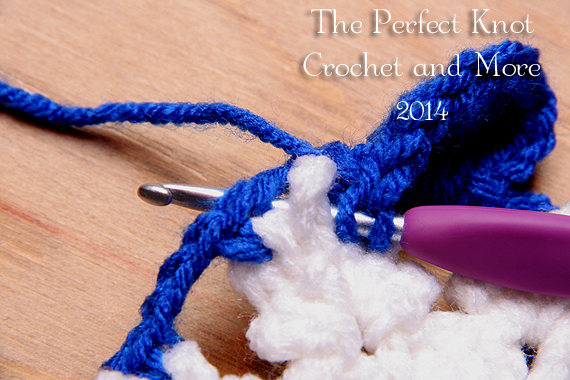
Round 4: Attach 2nd Color with a Sl St into the Ch 5 space on the left side of the 5 Ch space cluster petal (Right Ch 5 space if you are left handed) SEE PHOTO, 
Attach yarn here

Attach Yarn in the Ch 5 space indicated.
Ch 1, SC in same Space, *Ch 3, SC in next Ch 5 space on next petal, working behind Ch 7 space, Ch 3, SC in next Ch 5 space on same petal, Repeat from * around and Sl St to 1st SC to join (16 Ch 3 spaces, 16 SC)


Round 5 See Photo Tutorial Below if you have trouble with this round: Sl St into Ch 3 Space, [Ch 3 (counts as 1st DC), 2 Trbl, Ch 3, 2 Trbl, DC in same Space] corner made, *in next Ch 3 space DC, HDC in Ch 7 space at the point of the snowflake from Round 3 & around Ch 3 space from Round 4, DC in same Ch 3 space from Round 4, 3 HDC in next Ch 3 space, in next Ch 3 space DC, HDC in Ch 7 space at the point of the snowflake from Round 3 & Around Ch 3 space from Round 4, DC in same Ch 3 space from Round 4, in next Ch 3 space [DC, 2 Trbl, Ch 3, 2 Trbl, DC] corner made, Repeat from * around omitting last corner instructions, Sl St to top of beginning Ch 3 to join (60 Sts) 
After First Corner
After the first corner is formed you will be working into the Ch 3 space behind the point of the snowflake.


Make first DC into the Ch space BEHIND the point
Make the First DC into the Ch space behind the point.


Insert Hook Into the Ch 7 Space at the Point of the Snowflake


Make your HDC INTO the Ch 7 Space at the point of the Snowflake and insert your hook UNDER the Ch 3 space to complete the stitch worked Around the Ch space.


Finished HDC through the point should look like this
Your Stitch should look like this once completing the HDC through the point.


Make last DC into the Ch space behind the snowflake
Work the next DC into the Same Ch 3 space as the previous 2 stitches.


After Round 5 your square should measure 5”.

Round 6: Ch 1, SC in same St, SC in next 2 Sts to Ch 3 corner space, [2 SC, Ch 2, 2 SC] in Ch 3 corner space, *SC in next 15 Sts to next Ch 3 corner space, [2 SC, Ch 2, 2 SC] in next Ch 3 Corner space, Repeat from * to last corner, SC in next 12 Sts, Sl St to 1st SC to join (76 SC)
Round 7: Ch 1, SC in Same St, SC in next 4 Sts, in Ch 2 corner space [2 SC, Ch 2, 2 SC], *SC in next 19 Sts, in Ch 2 corner space [2 SC, Ch 2, 2 SC], Repeat from * to last corner, SC in next 14 Sts, Sl St to 1st SC to join, FO with an IJ and cut yarn tail (92 SC)
Using the tapestry needle, weave in your ends and discard remaining yarn tails.

Ta-Da! You’re finished!

© Copyright Michelle R. Kovach/The Perfect Knot 2012 - 2014. All rights reserved. All content & images in this pattern are protected under federal & international copyright laws. This is my original pattern. Do Not Copy, Modify, Reproduce, Redistribute, Sell or Claim as your own. You may sell items made from this pattern, but please Do NOT claim it as your own unique design. Please refer back to me as the original designer for any items you may sell. http://www.facebook.com/ThePerfectKnotCrochet  

Monday, August 25, 2014

Chair Sox Pattern

Chair Sox

In our house we have this linoleum flooring that looks like stone.
It's really pretty and I like the look of it in our kitchen.

Unfortunately though, we have an old dining set that all the chairs are losing their little rubber bottoms off the feet.

Our floor was getting scratched up or getting little marks in it so I decided I could come up with something that would help keep the chairs from messing up the floors. LOL And so Chair Sox were born!
I'm hoping that some of you out there can use this clever little invention of mine to help protect your hard wood, tile or linoleum floors! Enjoy and thanks for stopping by The Perfect Knot Crochet and More!

Michelle K
The Perfect Knot

Chair Sox

This is a beginner level pattern written in US Crochet terms.

Materials Needed:
Size 4.0mm Crochet Hook                           Stitch Marker
Tapestry Needle                                           Scissors
Worsted Weight Cotton Yarn (I used Premier Cotton Big Ball in my examples.)

Stitch Legend:
Mgc Rng – Magic Ring                                SC – Single Crochet
FO – Fasten Off                                          BLO – Back Loops Only
St – Stitch                                                    Sl St – Slip Stitch
* – Repeat from * around

NOTE: Pattern is worked in a spiral and not joined at the end of each Round. Use a Stitch Marker to mark the last stitch of each round and continue onto the next round’s directions.
Pattern is designed to fit about a 1” diameter chair leg either wooden or metal. Pattern is worked throughout using TWO strands of worsted weight cotton yarn.

CHAIR SOX – Make 4


Let’s begin!
Round 1: Begin with a Mgc Rng, 6 SC into ring, pull yarn tail to close (6 SC)
Round 2: *2 SC in next St, Repeat around (12 SC)
Round 3: SC in each St around (12 SC)
Round 4: Working into the BLO, SC in each St around (12 SC)
Rounds 5 – 8: SC in both loops of each St around, after last St on Round 8, Sl St into next St and FO and weave in yarn tails using the tapestry needle. (12 SC)
Slide Chair Sox over the bottoms of your chair legs to help protect your hard wood or linoleum flooring.
Congratulations! You’re finished!


© Copyright Michelle R. Kovach/The Perfect Knot 2014. All rights reserved. All content & images in this pattern are protected under federal & international copyright laws. This is my original pattern. Do Not Copy, Modify, Reproduce, Redistribute, Sell or Claim as your own. You may sell items made from this pattern, but please Do NOT claim it as your own unique design. Please refer back to me as the original designer for any items you may sell.

http://www.facebook.com/ThePerfectKnotCrochet  


Friday, July 11, 2014

New Beach Accessories for The My First Babies!

My First Babies Beach Boy Accessories

It's summer here in the Northern Hemisphere and for many that means sun, fun, beaches, pool parties and swimming!
I know that's how I enjoy spending my summers. :)

I just wanted to take a moment to introduce you to the latest accessories set for the My First Babies Collection!

This is the My First Babies Beach Boy Accessories. He's ready to hit the beach, have some fun, surf a few waves and catch some rays!

Pattern includes Surfboard, Surf Shorts, Beach Towel, Beach Ball, Bucket and Shovel, and a cool pair of Shades!


You can purchase the pattern here in my Ravelry Shop. (PLEASE NOTE THIS PATTERN IS FOR THE ACCESSORIES ONLY. If you wish to create the dolls that the accessories fit you will need to purchase The My First Babies Dolls Pattern separately.)

While you're checking out the pattern in my Ravelry shop, be sure to take a look at all the other My First Babies accessories!

I'm having so much fun with these patterns and I hope you will enjoy making them as much as I have. Not to worry, more accessories for both babies are coming soon!

Have a great day and thanks for stopping by The Perfect Knot Crochet and More!

Michelle K
The Perfect Knot


Wednesday, July 2, 2014

Paisley Rose Headband Pattern

Paisley Rose Headband

Introducing the Paisley Rose Headband!

This is a pretty little accessory that can easily be adapted to fit any head size.

Something simple that you can easily dress up by adding the Rose to it or keep it simple by leaving the flower off.

So, without any further ado... The Paisley Rose Headband!

Paisley Rose Headband

This is an Intermediate level pattern written in US Crochet terms.

Materials Needed:

Size 4.0mm Crochet Hook
Tapestry Needle
Worsted Weight Yarn (I used Red Heart Soft Rose Blush & Caron Simply Soft Off White & Sage in my example.)

Stitch Legend:
Ch – Chain                                        Sl St – Slip Stitch
HDC – Half Double Crochet              DC – Double Crochet
St – Stitch                                          Sts – Stitches
FO – Fasten Off

Finished Measurements: 14” around
Gauge: 5 Stitches in 1”


HEADBAND – Pattern is written for a baby size but you can easily adjust the length of this headband to fit any head just by repeating Shell 3 until you reach your desired length.
Row 1: Ch 4, 5 HDC in 4th Ch from hook, Ch 30 (this will be the back of the headband), Sl St into 2nd Ch & into each Ch back to Shell, Sl St into the center of the Shell

Shell 2: Ch 2, working around the beginning Ch 4, 5 HDC, Ch 3, Sl St back into center of Shell

Shell 3: Ch 2 & turn, working around Ch 3, 5 HDC, Ch 3, Sl St back into center of Shell

Repeat Shell 3 until you have 13 Shells or until you desired length

Last Shell: Ch 2 & turn, working around Ch 3, 6 HDC, bring Ch with Sl Sts up without twisting it & Sl St into 1st St at end of Ch to join, Ch 1 & FO.
Using the tapestry needle, weave in your ends & cut excess yarn.

ROSE
Row 1: Begin with Off White yarn Ch 16, SC in 2nd Ch from hook & to each St across (15 SC)

Row 2: Ch 1 & turn, 5 HDC in same St, *Sl St into next St, 5 HDC in next St, Repeat across & Sl St into last St as same petal, (40 HDC) FO leaving a long tail for sewing. (18 – 24”)

Using the tapestry needle weave in your beginning yarn tail. Starting at the end where you last FO, twist your petals into a spiral & stitch rose together.

LEAF – Make 2

Round 1: Begin with Sage colored yarn & a longer tail on one leaf for sewing (12 – 15”), Ch 6, SC in 2nd Ch from hook, HDC in next Ch, DC in next Ch, HDC in next Ch, 3 SC in last Ch, working into bottom of Ch, HDC in next Ch, DC in next Ch, HDC in next Ch, SC in last Ch, Ch 2, Invisible join to 1st SC to join, FO (11 Sts)
Using the tapestry needle weave in your ending yarn tail, Stitch each leaf to bottom of rose so that leaves show out the sides of the Rose. Stitch the Rose onto the 4th Shell of one side of the headband. Weave in remaining ends & cut excess yarn.


© Copyright Michelle R. Kovach/The Perfect Knot 2012 - 2014. All rights reserved. All content & images in this pattern are protected under federal & international copyright laws. This is my original pattern. Do Not Copy, Modify, Reproduce, Redistribute, Sell or Claim as your own. You may sell items made from this pattern, but please Do NOT claim it as your own unique design. Please refer back to me as the original designer for any items you may sell. http://www.facebook.com/ThePerfectKnotCrochet

Friday, June 20, 2014

My First Babies Bundle Sale

My First Babies Bundle

I've been having so much fun making these little dolls & their outfits!

I never thought that it would turn into the wonderfully fun thing it has, but I am so excited about it & so happy that you all are loving them as much as I am!

Currently there are 5 Patterns listed in the My First Babies Collection! (And not to worry, yes, I am currently in production of making them more outfits! ;) )

This weekend though, I wanted to let you know that they are on Sale 30% off on Ravelry with the New Bundles Option that Ravelry has created (which I LOVE!) using the coupon code BabyBundle!
You can purchase the Bundle package here: http://www.ravelry.com/bundles/1635

Stay tuned for more of the babies and all of their latest Fashions!

Thanks for stopping by The Perfect Knot Crochet and More!

Have a great day!

Michelle K
The Perfect Knot

My First Babies Dress up Dolls Set


My First Babies Baseball Player Accessories Set


My First Babies Ballet Accessories Set


My First Babies Football Player Accessories


My First Babies Cheerleader Accessories