Showing posts with label Free Tutorial. Show all posts

Wednesday, December 3, 2014

Winter Bliss Square - Crochet Pattern

Winter Bliss Square by The Perfect Knot

Hello my Tangled Friends!

I know I have been MIA for several months now and I have definitely missed all of you!
Life gets in the way of play and sometimes you just have to put play on hold.

Anyway though... I'm BACK!!!!!!! And I have a goodie for you all to play with!

It's winter time in the US here and my brain is thinking "I want snow", while my body is going "Not yet!" LOL. So to fight the war between the two, I opted for Snow in Yarn! That way everyone wins and you can be warm while thinking cold. ;)

So without any further ado, here is the Free Pattern I promised you!
Enjoy and happy crocheting!

Michelle K
The Perfect Knot Crochet and More

Winter Bliss Square
This is an Intermediate level pattern written in US Crochet terms.

Materials Needed:
Size 4.0mm Crochet Hook                 
Tapestry Needle                                 Tape Measure
Scissors       
Size 4 Worsted Weight Yarn in 2 Colors (I used Red Heart With Love in my Example.)

Stitch Legend:
Ch – Chain                                        Sl St – Slip Stitch
SC – Single Crochet                          DC – Double Crochet
Trbl – Treble Crochet                        HDC – Half Double Crochet
FO – Fasten Off                                IJ – Invisible Join
St – Stitch                                          Sts – Stitches
[ ] – Stitches worked into the same space or Stitch
* – Repeat instructions from *

Special Stitches or Directions:
Triple Loop Start: Alternative to a Magic Circle that does not slide open like a traditional Magic Circle.

HOW TO DO A TRIPLE LOOP START: Wrap yarn around finger 3 times, insert hook under first 2 loops, catch 3rd loop with hook and pull through under the 2 loops on your finger. Once you pull the loop through, then you will begin your chain to secure the loops and start your first stitch. You will pull the tail of the yarn from the loop to close the loop tight. You may need to pull one strand of the loop & then the second strand of the loop so that you can fully close the yarn tail of the loop.

Your square should measure 6” when completed.

Let’s Begin!

Round 1: Begin with White yarn and a Triple Loop Start or a Magic Circle, Ch 5 (counts as 1st DC & Ch 2 space), Working all Sts into the loop, DC, Ch 2, *DC, Ch 2, Repeat from * 5 More Times & Sl St to the 3rd Ch of the beginning Ch 5 to join (8 DC & 8 Ch 2 spaces) Pull yarn tail to close loop
Round 2: Sl St into Ch 2 space, Ch 3 (counts as 1st DC), 3 DC in same Space, Ch 2, *4 DC in next Ch 2 space, Ch 2, Repeat from * around and Sl St to top of beginning Ch 3 to join (32 DC & 8 Ch 2 spaces)
Round 3: *Sl St into each DC to next Ch 2 space, Working in the Ch 2 space [Ch 3, Sl St in same Ch 2 space, Ch 5, Sl St in same Ch 2 space, Ch 7, Sl St in same Ch 2 space, Ch 5, Sl St in same Ch 2 space, Ch 3, Sl St in same Ch 2 space], Repeat from * around in each Ch 2 space, Sl St in 1st Sl St to join & FO White yarn (5 Ch space Cluster Petals in each Ch 2 space)
Round 4: Attach 2nd Color with a Sl St into the Ch 5 space on the left side of the 5 Ch space cluster petal (Right Ch 5 space if you are left handed) SEE PHOTO
Attach yarn here

Attach Yarn in the Ch 5 space indicated.
Ch 1, SC in same Space, *Ch 3, SC in next Ch 5 space on next petal, working behind Ch 7 space, Ch 3, SC in next Ch 5 space on same petal, Repeat from * around and Sl St to 1st SC to join (16 Ch 3 spaces, 16 SC)


Round 5 See Photo Tutorial Below if you have trouble with this round: Sl St into Ch 3 Space, [Ch 3 (counts as 1st DC), 2 Trbl, Ch 3, 2 Trbl, DC in same Space] corner made, *in next Ch 3 space DC, HDC in Ch 7 space at the point of the snowflake from Round 3 & around Ch 3 space from Round 4, DC in same Ch 3 space from Round 4, 3 HDC in next Ch 3 space, in next Ch 3 space DC, HDC in Ch 7 space at the point of the snowflake from Round 3 & Around Ch 3 space from Round 4, DC in same Ch 3 space from Round 4, in next Ch 3 space [DC, 2 Trbl, Ch 3, 2 Trbl, DC] corner made, Repeat from * around omitting last corner instructions, Sl St to top of beginning Ch 3 to join (60 Sts) 
After First Corner
After the first corner is formed you will be working into the Ch 3 space behind the point of the snowflake.


Make first DC into the Ch space BEHIND the point
Make the First DC into the Ch space behind the point.
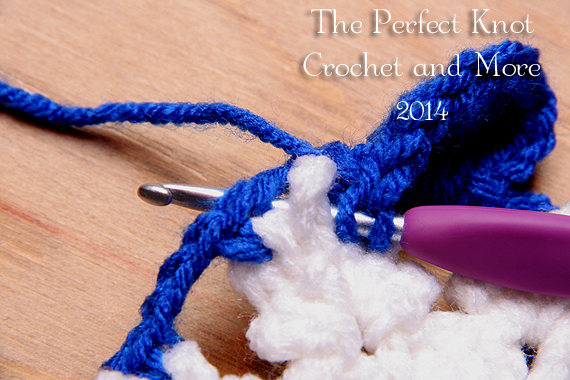


Insert Hook Into the Ch 7 Space at the Point of the Snowflake


Make your HDC INTO the Ch 7 Space at the point of the Snowflake and insert your hook UNDER the Ch 3 space to complete the stitch worked Around the Ch space.


Finished HDC through the point should look like this
Your Stitch should look like this once completing the HDC through the point.


Make last DC into the Ch space behind the snowflake
Work the next DC into the Same Ch 3 space as the previous 2 stitches.


After Round 5 your square should measure 5”.

Round 6: Ch 1, SC in same St, SC in next 2 Sts to Ch 3 corner space, [2 SC, Ch 2, 2 SC] in Ch 3 corner space, *SC in next 15 Sts to next Ch 3 corner space, [2 SC, Ch 2, 2 SC] in next Ch 3 Corner space, Repeat from * to last corner, SC in next 12 Sts, Sl St to 1st SC to join (76 SC)
Round 7: Ch 1, SC in Same St, SC in next 4 Sts, in Ch 2 corner space [2 SC, Ch 2, 2 SC], *SC in next 19 Sts, in Ch 2 corner space [2 SC, Ch 2, 2 SC], Repeat from * to last corner, SC in next 14 Sts, Sl St to 1st SC to join, FO with an IJ and cut yarn tail (92 SC)
Using the tapestry needle, weave in your ends and discard remaining yarn tails.

Ta-Da! You’re finished!

© Copyright Michelle R. Kovach/The Perfect Knot 2012 - 2014. All rights reserved. All content & images in this pattern are protected under federal & international copyright laws. This is my original pattern. Do Not Copy, Modify, Reproduce, Redistribute, Sell or Claim as your own. You may sell items made from this pattern, but please Do NOT claim it as your own unique design. Please refer back to me as the original designer for any items you may sell. http://www.facebook.com/ThePerfectKnotCrochet  

Monday, June 9, 2014

Traditional Granny Square Modified

Traditional Granny Square

Traditional Granny Square Pattern

This is a modification of a traditional Granny Square pattern that will measure 6” and include a closed round of Single Crochet.

Many Charities I work with ask for a closed edge on the square so that it keeps an open-worked square from warping during the blanket assembly. This can be hard to accomplish if you do all Double Crochet for the pattern as it is traditionally written. I have created a slight modification of the square so that you can easily get a 6" square with a closed edge of SC on the last round & have a nice shaped square.
So let's begin!

Materials Needed:
Size 4.0mm Crochet Hook                                             Tapestry Needle    
Scissors                                                                                Tape Measure

Red Heart or other Worsted Weight Yarn of comparable size (I used Red Heart with Love in my example.)

Stitch Legend:
Ch – Chain                                                              Mgc Rng – Magic Ring
DC – Double Crochet                                           HDC – Half Double Crochet
SC – Single Crochet                                             Sl St – Slip Stitch
[ ] – Stitches worked into the same space
* – Repeat instructions from *                        


Begin:  Either Ch 4 & Sl St to join or use a Mgc Ring & pull the yarn tail closed after you finish the first round
Round 1: Ch 3 (Counts as 1st DC here and throughout), 2 DC, Ch 2, *3 DC, Ch 2, Repeat from * twice more, Sl St to top of beginning Ch 3 to join (12 DC)

Round 2: Sl St into next 2 DC & into the Ch 2 corner space, [Ch 3, 2 DC, Ch 2, 3 DC], Ch 1, *In next Ch 2 corner space [3 DC, Ch 2, 3 DC], Ch 1, Repeat from * twice more, Sl St to top of beginning Ch 3 to join (24 DC)

Round 3: Sl St into next 2 DC & into the Ch 2 corner space, [Ch 3, 2 DC, Ch 2, 3 DC], Ch 1, *In next Ch 1 space between clusters 3 DC, Ch 1, in next Ch 2 corner space [3 DC, Ch 2, 3 DC], Ch 1, Repeat from * twice more, Sl St to top of beginning Ch 3 to join (36 DC)

Round 4: Sl St into next 2 DC & into the Ch 2 corner space, [Ch 3, 2 DC, Ch 2, 3 DC], Ch 1, *In next Ch 1 space between clusters 3 DC, Ch 1, in next Ch 1 Space, 3 DC, Ch 1,  in next Ch 2 corner space [3 DC, Ch 2, 3 DC], Ch 1, Repeat from * twice more, Sl St to top of beginning Ch 3 to join (48 DC)

After this round your square should measure approximately 5”. Measure your square to be certain your measurements match.

Round 5: Sl St into next 2 DC & into the Ch 2 corner space, [Ch 2 (Counts as 1st HDC), 2 HDC, Ch 2, 3 HDC], Ch 1, *3 HDC in next Ch 1 space, Ch 1, 3 HDC in next Ch 1 space, Ch 1, 3 HDC in next Ch 1 space, Ch 1, in next Ch 2 corner space [3 HDC, Ch 2, 3 HDC], Ch 1, Repeat from * twice more, Sl St to top of beginning Ch 2 to join (60 HDC)

After this round your square should measure approximately 5.5”. Measure your square to be certain your measurements match.

Round 6: Ch 1, SC in same St, SC in next 2 HDC, in Ch 2 corner space [2 SC, Ch 2, 2 SC], SC in each HDC & in each Ch 1 space, in each Ch 2 corner space [2 SC, Ch 2, 2 SC], Repeat around, break off yarn & invisible join to 1st SC using the tapestry needle. (92 SC) 

Here is a tutorial for the invisible join http://www.youtube.com/watch?v=9jyT6Okd8LI


Use the tapestry needle and this method to weave in your ends to secure http://theperfectknotcrochetandmore.blogspot.com/2013/10/how-to-weave-in-your-ends-in-crochet.html  

Completed square measuring 6 inches


Congratulations! You have just completed a modified traditional granny square!

If your gauge matches correctly your square should measure 6" exactly. Depending upon how tightly or loosely you crochet, your measurements could vary slightly. It is always best to measure your square after each round to be sure your measurements are on target to hit your 6 inch size. :) You can adjust your hook & yarn size if necessary to meet the required 6 inch size.

Thanks for stopping by The Perfect Knot Crochet and More!

Enjoy your new pattern!

Have a great day!

Michelle K
The Perfect Knot

© Copyright Michelle R. Kovach/The Perfect Knot 2012 - 2014. All rights reserved. All content & images in this pattern are protected under federal & international copyright laws. This is my original pattern. Do Not Copy, Modify, Reproduce, Redistribute, Sell or Claim as your own. You may sell items made from this pattern, but please Do NOT claim it as your own unique design. Please refer back to me as the original designer for any items you may sell.

Wednesday, May 28, 2014

Adding Character to your Amigurumi Eyes

Eyes tutorial by The Perfect Knot

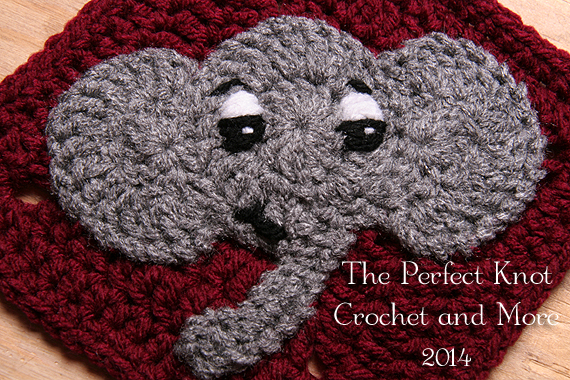
About a week or two ago I posted this picture of this little elephant for a project I was working on.
The response to his eyes & facial expression was overwhelming & I had people asking for a tutorial on how to do the eyes.

So I set out to work in trying to explain what I did. The easiest way for me to tell you is to "show you", so I have created a detailed photo tutorial for you to follow along with.

One of the easiest ways to add character to your Amigurumi, appliques or even your character type hats is to create a great expression and that generally starts with the eyes. If you can convey an emotion or expression through the eyes of your piece you will add a lot of character to your project.

So today we're going to create these whimsical looking happy eyes.

You will need to know basic embroidery skills and you will need either black & white yarn, embroidery floss or thread & a tapestry or sewing needle. I used yarn for the tutorial & a large eye tapestry needle.

Okay, let's get started!

One of the things you will want to do is to plot out on your piece where you want the placement of your eyes to go. Remember placing them too high or too low on your face will make them look awkward & not give you the intended expression you want. So what I usually do is to take a tape measure & space them evenly within the head of my piece closer to the top of the project where most people would have their eyes.
Leave space below for a nose & mouth as you will want to generally add those too.

So next you need to decide on the shape of your eyes. In this case I went with an Oval shape. I would recommend you actually practice drawing this out on a piece of paper or other fabric before you apply it to your finished project. After all you don't want to have to cut & remove stitches from your actual piece if you don't like it. ;)
Decide on the shape of the eyes you want to help
convey your expression


Next you are going to create sort of any imaginary line where you want your black part and your white part to stop. In most cases you want a tiny bit more black or colored part more than you would the white part, so I map my eyes so that the line for the colored iris would hit just above the center of the eye giving me more color that white.

Map the two color parts of your eye so that you have slightly more Iris
than White.


Fill in the colored area at the bottom to give yourself an idea of where
your colored part will go.
So once you have your eye shape mapped out you will want to fill in where you want the black & white parts to go just so you can have an idea of what it will look like.


Now the next thing that you will want to do to give your eyes a little life & light to them is to decide on placement of a catch light. Real eyes reflect light so you can see where the light is coming from. If you add a small catch light to your eyes it will give them a little more life & depth & create a more realistic expression.
So the way you do this is to decide where your light source would be in your project & to place the catch lights in the same position of each eye so it looks like you have a single light source hitting the eye. Just like if you were outside & the sun hit the eyes you would get this little sparkle in your eyes.

Choose your light source direction and choose placement
of the Catch Lights to give added depth an expression to
your eyes
So in my case I decided that the light source would be above my little character on the right above him. So the catch lights would both go on the right side of his eyes kind of high up in the iris.

You will want to make your catch lights symmetrical in both the size & placement. You do not want to put one on one side & then the other on the opposite side or your character will look cross-eyed. You also do not want to put them dead center of the eye or your eyes will look blank and like little targets. Remember real eyes are curved in shape and light will bend around the curve of the eye.


Once you have your catch lights placed the next thing you will want to do is decide on the eyebrows of your character. If his eyebrows are up at an angle slightly or curved you will have a more realistic or happy expression & if they are straight across or coming down at an angle it can look like his brow is furrowed or he is angry.
For this tutorial I went with the happy whimsical expression so I angled his eyebrows up just slightly.

Choosing the angle of your eyebrows will determine
if your character is happy, excited, angry or sad


Okay so now that you have the idea of how you want your character's face to look and the expression in the eyes lets put all of that into practice and apply the eyes to the face.


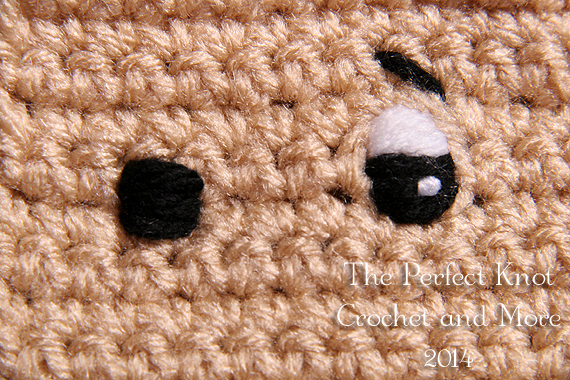
Staring out with the black yarn and working from the bottom of the eye up, you are going to insert the needle from the back of the piece to the front horizontally to create a small horizontal stitch for the bottom of the eye. Usually going over about 1 stitches width in single crochet is enough.
Insert your needle back into the fabric & wrap to the back of your piece.

It is important not to pull your stitches too tightly or you will distort your eye.


For your next stitch you will come back up just a tiny bit over from the first stitch & then back down just a tiny bit over on the opposite side.
You will be creating a series of graduated stitches to form the shape of the oval of the eye.


Make your first 3 or 4 stitches graduated so that the bottom of the eye widens up to the point you want it to go. Then when you get the width you want, you will stop widening your stitches & work your Iris so that your stitches are the same size until you reach the center of the eye.


After about 5 or 6 stitches you should start to see the bottom of your eye taking shape.

Once you get to your desired height & width of the bottom of the eye, then you will remove the needle from the black yarn (don't cut the yarn though, you will need it later) & attach your white yarn to start forming the top of your eye.


You will now attach the white yarn to the needle & working from the back of the piece to the front, insert your needle just above the place where your last black stitch came out.
Take the needle across to the opposite side of the eye at the same width as the last black stitch & insert your needle from the front to the back & wrap the yarn back around.

You are going to be creating another series of graduated stitches with the white yarn but in reverse of what you did before. Your stitches will be getting smaller as you work up instead of bigger like they did when you were doing the black part. This will create the gradual oval shape you want for the eyes.

Keep your stitches the same width as the black stitches for about 3 or 4 stitches before you begin making your stitches smaller/shorter.


Once you get to your desired height on the eye you will begin making your stitches slightly shorter to create the curve of the oval shape for the eye.


Once you finish the shape of the eye you want, you are going to add your catch lights. Working UNDER the stitches in the back, you are going to weave your needle through the yarn at the back of the piece & exit the needle into the black part of the Iris on the front of your piece. Remember where you decided to place the catch lights for your light source & exit your needle at that approximate position. In my case this was to the right side of my black part & higher up in the eye.


You will come up over the top of one strand of the black yarn and insert your needle back down into the fabric. Don't pull too tightly or you will bury the yarn into the other strands of the darker yarn.

At this point you are finished working with the white yarn & you can fasten it off securely by weaving in the yarn to the back of your eye.


Now you are going to Reattach the black yarn from where you made the Iris. (You can also do this part with a colored yarn if you like to add some color to your eye.) Once again working from the back to the front, insert your needle at the dividing line of the eye where the white & black meet. Bring the needle up through the fabric and take your yarn across to the opposite side of the eye & enter the fabric from the front to the back. This stitch will help to hide the dividing line of the eye & even it up.


Now you are going to make the eyebrows. You will insert your needle about one row above the corner of the eye from the back to the front of your piece and working at an angle you will insert your needle back into the fabric from the front to the back. Usually about one or two stitches is sufficient for the length of your stitch.

You can now fasten off and secure your black yarn at the back of your piece by weaving in your ends.


To make your second eye you will start at the bottom of your first eye and count over the even number of stitches you selected for your placement of the eyes. In my case it was starting 4 stitches over from the 1st eye.

You will want to start your second eye on the same row as you did your first eye, so line up the bottom of the first eye with your tape measure or ruler and then count over from there.

Insert the needle from back to front & repeat as before working graduated shorter stitches to larger stitches, and then the same sized stitches until you build up your Iris to be the same size as your other eye.

Once you finish with the Iris, again, do not cut the yarn as you will need it for your center stitch later, and reattach the white yarn to build up the white of the eye.


One you complete the second white part of the eye, you will again add your catch light to the eye. Weave your needle UNDER the yarn to the back and exit the needle again to the right side higher in the black part for the second catch light. Come down over only one strand of the yarn and insert the needle back into the piece from the front to the back.

Fasten off the white yarn & reattach the black yarn to come back across for your dividing line stitch to even up the two parts of the eye.

Next you will make the second eyebrow. With the black yarn, exit the fabric from the back to the front about one row up from the corner of the eye at an angle to make the second stitch for the eyebrow.
Insert needle back into fabric from front to back. Again, one to two stitches is more than enough for the eyebrow's length.

Fasten off the black yarn & weave in your ends to the back of the piece.


After finishing both eyes your piece should look something like this.


Now to finish your expression you can add your smile or mouth of choice and you are all finished.

Reattach the black yarn lower on the face maybe 2 or 3 rows below the eyes to create the smile or mouth.
Work from the back to the front of the piece to create the mouth.
I gave my little character a cute little upturned smile using 2 angled long stitches and two shorter ones for the corners of the mouth.


Once you have created the expression you want, secure your yarn to the back of your piece & weave in your ends. Ta-Da! You're finished and now you have a cute little character face with lots of personality!

I hope you have enjoyed this tutorial and that you will find it useful in your future projects. Thanks for stopping by The Perfect Knot Crochet and More!

Have a great day & God Bless!

Happy Stitching!

Michelle K
The Perfect Knot