Showing posts with label Amigurumi. Show all posts

Friday, July 11, 2014

New Beach Accessories for The My First Babies!

My First Babies Beach Boy Accessories

It's summer here in the Northern Hemisphere and for many that means sun, fun, beaches, pool parties and swimming!
I know that's how I enjoy spending my summers. :)

I just wanted to take a moment to introduce you to the latest accessories set for the My First Babies Collection!

This is the My First Babies Beach Boy Accessories. He's ready to hit the beach, have some fun, surf a few waves and catch some rays!

Pattern includes Surfboard, Surf Shorts, Beach Towel, Beach Ball, Bucket and Shovel, and a cool pair of Shades!


You can purchase the pattern here in my Ravelry Shop. (PLEASE NOTE THIS PATTERN IS FOR THE ACCESSORIES ONLY. If you wish to create the dolls that the accessories fit you will need to purchase The My First Babies Dolls Pattern separately.)

While you're checking out the pattern in my Ravelry shop, be sure to take a look at all the other My First Babies accessories!

I'm having so much fun with these patterns and I hope you will enjoy making them as much as I have. Not to worry, more accessories for both babies are coming soon!

Have a great day and thanks for stopping by The Perfect Knot Crochet and More!

Michelle K
The Perfect Knot


Friday, June 20, 2014

My First Babies Bundle Sale

My First Babies Bundle

I've been having so much fun making these little dolls & their outfits!

I never thought that it would turn into the wonderfully fun thing it has, but I am so excited about it & so happy that you all are loving them as much as I am!

Currently there are 5 Patterns listed in the My First Babies Collection! (And not to worry, yes, I am currently in production of making them more outfits! ;) )

This weekend though, I wanted to let you know that they are on Sale 30% off on Ravelry with the New Bundles Option that Ravelry has created (which I LOVE!) using the coupon code BabyBundle!
You can purchase the Bundle package here: http://www.ravelry.com/bundles/1635

Stay tuned for more of the babies and all of their latest Fashions!

Thanks for stopping by The Perfect Knot Crochet and More!

Have a great day!

Michelle K
The Perfect Knot

My First Babies Dress up Dolls Set


My First Babies Baseball Player Accessories Set


My First Babies Ballet Accessories Set


My First Babies Football Player Accessories


My First Babies Cheerleader Accessories

Wednesday, May 28, 2014

Adding Character to your Amigurumi Eyes

Eyes tutorial by The Perfect Knot

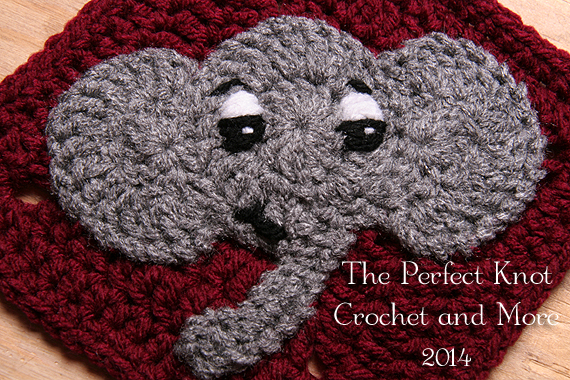
About a week or two ago I posted this picture of this little elephant for a project I was working on.
The response to his eyes & facial expression was overwhelming & I had people asking for a tutorial on how to do the eyes.

So I set out to work in trying to explain what I did. The easiest way for me to tell you is to "show you", so I have created a detailed photo tutorial for you to follow along with.

One of the easiest ways to add character to your Amigurumi, appliques or even your character type hats is to create a great expression and that generally starts with the eyes. If you can convey an emotion or expression through the eyes of your piece you will add a lot of character to your project.

So today we're going to create these whimsical looking happy eyes.

You will need to know basic embroidery skills and you will need either black & white yarn, embroidery floss or thread & a tapestry or sewing needle. I used yarn for the tutorial & a large eye tapestry needle.

Okay, let's get started!

One of the things you will want to do is to plot out on your piece where you want the placement of your eyes to go. Remember placing them too high or too low on your face will make them look awkward & not give you the intended expression you want. So what I usually do is to take a tape measure & space them evenly within the head of my piece closer to the top of the project where most people would have their eyes.
Leave space below for a nose & mouth as you will want to generally add those too.

So next you need to decide on the shape of your eyes. In this case I went with an Oval shape. I would recommend you actually practice drawing this out on a piece of paper or other fabric before you apply it to your finished project. After all you don't want to have to cut & remove stitches from your actual piece if you don't like it. ;)
Decide on the shape of the eyes you want to help
convey your expression


Next you are going to create sort of any imaginary line where you want your black part and your white part to stop. In most cases you want a tiny bit more black or colored part more than you would the white part, so I map my eyes so that the line for the colored iris would hit just above the center of the eye giving me more color that white.

Map the two color parts of your eye so that you have slightly more Iris
than White.


Fill in the colored area at the bottom to give yourself an idea of where
your colored part will go.
So once you have your eye shape mapped out you will want to fill in where you want the black & white parts to go just so you can have an idea of what it will look like.


Now the next thing that you will want to do to give your eyes a little life & light to them is to decide on placement of a catch light. Real eyes reflect light so you can see where the light is coming from. If you add a small catch light to your eyes it will give them a little more life & depth & create a more realistic expression.
So the way you do this is to decide where your light source would be in your project & to place the catch lights in the same position of each eye so it looks like you have a single light source hitting the eye. Just like if you were outside & the sun hit the eyes you would get this little sparkle in your eyes.

Choose your light source direction and choose placement
of the Catch Lights to give added depth an expression to
your eyes
So in my case I decided that the light source would be above my little character on the right above him. So the catch lights would both go on the right side of his eyes kind of high up in the iris.

You will want to make your catch lights symmetrical in both the size & placement. You do not want to put one on one side & then the other on the opposite side or your character will look cross-eyed. You also do not want to put them dead center of the eye or your eyes will look blank and like little targets. Remember real eyes are curved in shape and light will bend around the curve of the eye.


Once you have your catch lights placed the next thing you will want to do is decide on the eyebrows of your character. If his eyebrows are up at an angle slightly or curved you will have a more realistic or happy expression & if they are straight across or coming down at an angle it can look like his brow is furrowed or he is angry.
For this tutorial I went with the happy whimsical expression so I angled his eyebrows up just slightly.

Choosing the angle of your eyebrows will determine
if your character is happy, excited, angry or sad


Okay so now that you have the idea of how you want your character's face to look and the expression in the eyes lets put all of that into practice and apply the eyes to the face.


Staring out with the black yarn and working from the bottom of the eye up, you are going to insert the needle from the back of the piece to the front horizontally to create a small horizontal stitch for the bottom of the eye. Usually going over about 1 stitches width in single crochet is enough.
Insert your needle back into the fabric & wrap to the back of your piece.

It is important not to pull your stitches too tightly or you will distort your eye.


For your next stitch you will come back up just a tiny bit over from the first stitch & then back down just a tiny bit over on the opposite side.
You will be creating a series of graduated stitches to form the shape of the oval of the eye.


Make your first 3 or 4 stitches graduated so that the bottom of the eye widens up to the point you want it to go. Then when you get the width you want, you will stop widening your stitches & work your Iris so that your stitches are the same size until you reach the center of the eye.


After about 5 or 6 stitches you should start to see the bottom of your eye taking shape.

Once you get to your desired height & width of the bottom of the eye, then you will remove the needle from the black yarn (don't cut the yarn though, you will need it later) & attach your white yarn to start forming the top of your eye.


You will now attach the white yarn to the needle & working from the back of the piece to the front, insert your needle just above the place where your last black stitch came out.
Take the needle across to the opposite side of the eye at the same width as the last black stitch & insert your needle from the front to the back & wrap the yarn back around.

You are going to be creating another series of graduated stitches with the white yarn but in reverse of what you did before. Your stitches will be getting smaller as you work up instead of bigger like they did when you were doing the black part. This will create the gradual oval shape you want for the eyes.

Keep your stitches the same width as the black stitches for about 3 or 4 stitches before you begin making your stitches smaller/shorter.


Once you get to your desired height on the eye you will begin making your stitches slightly shorter to create the curve of the oval shape for the eye.


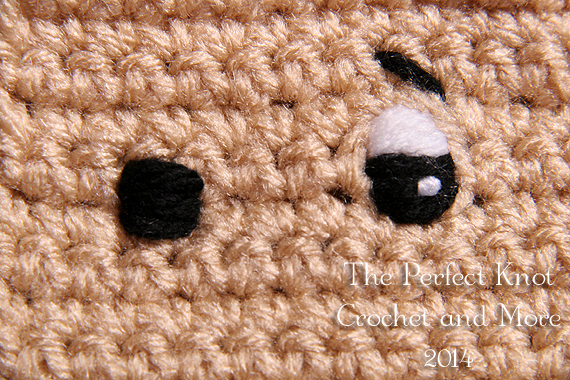
Once you finish the shape of the eye you want, you are going to add your catch lights. Working UNDER the stitches in the back, you are going to weave your needle through the yarn at the back of the piece & exit the needle into the black part of the Iris on the front of your piece. Remember where you decided to place the catch lights for your light source & exit your needle at that approximate position. In my case this was to the right side of my black part & higher up in the eye.


You will come up over the top of one strand of the black yarn and insert your needle back down into the fabric. Don't pull too tightly or you will bury the yarn into the other strands of the darker yarn.

At this point you are finished working with the white yarn & you can fasten it off securely by weaving in the yarn to the back of your eye.


Now you are going to Reattach the black yarn from where you made the Iris. (You can also do this part with a colored yarn if you like to add some color to your eye.) Once again working from the back to the front, insert your needle at the dividing line of the eye where the white & black meet. Bring the needle up through the fabric and take your yarn across to the opposite side of the eye & enter the fabric from the front to the back. This stitch will help to hide the dividing line of the eye & even it up.


Now you are going to make the eyebrows. You will insert your needle about one row above the corner of the eye from the back to the front of your piece and working at an angle you will insert your needle back into the fabric from the front to the back. Usually about one or two stitches is sufficient for the length of your stitch.

You can now fasten off and secure your black yarn at the back of your piece by weaving in your ends.


To make your second eye you will start at the bottom of your first eye and count over the even number of stitches you selected for your placement of the eyes. In my case it was starting 4 stitches over from the 1st eye.

You will want to start your second eye on the same row as you did your first eye, so line up the bottom of the first eye with your tape measure or ruler and then count over from there.

Insert the needle from back to front & repeat as before working graduated shorter stitches to larger stitches, and then the same sized stitches until you build up your Iris to be the same size as your other eye.

Once you finish with the Iris, again, do not cut the yarn as you will need it for your center stitch later, and reattach the white yarn to build up the white of the eye.


One you complete the second white part of the eye, you will again add your catch light to the eye. Weave your needle UNDER the yarn to the back and exit the needle again to the right side higher in the black part for the second catch light. Come down over only one strand of the yarn and insert the needle back into the piece from the front to the back.

Fasten off the white yarn & reattach the black yarn to come back across for your dividing line stitch to even up the two parts of the eye.

Next you will make the second eyebrow. With the black yarn, exit the fabric from the back to the front about one row up from the corner of the eye at an angle to make the second stitch for the eyebrow.
Insert needle back into fabric from front to back. Again, one to two stitches is more than enough for the eyebrow's length.

Fasten off the black yarn & weave in your ends to the back of the piece.


After finishing both eyes your piece should look something like this.


Now to finish your expression you can add your smile or mouth of choice and you are all finished.

Reattach the black yarn lower on the face maybe 2 or 3 rows below the eyes to create the smile or mouth.
Work from the back to the front of the piece to create the mouth.
I gave my little character a cute little upturned smile using 2 angled long stitches and two shorter ones for the corners of the mouth.


Once you have created the expression you want, secure your yarn to the back of your piece & weave in your ends. Ta-Da! You're finished and now you have a cute little character face with lots of personality!

I hope you have enjoyed this tutorial and that you will find it useful in your future projects. Thanks for stopping by The Perfect Knot Crochet and More!

Have a great day & God Bless!

Happy Stitching!

Michelle K
The Perfect Knot


Thursday, May 1, 2014

Campfire The Mini Marshmallow By The Perfect Knot

Campfire The Mini Marshmallow by The Perfect Knot

Meet Campfire! He’s a sweet little Marshmallow who just wants to play!
Make one for your little one or make a whole bunch & have a Marshmallow fight with your friends & family!
He’s just too cute not to play with & smile at!


Campfire The Mini Marshmallow Amigurumi

This is an intermediate level pattern written in US Crochet terms.

Materials Needed:
Size 3.75mm Crochet hook
White Worsted Weight Yarn
6mm Black Safety Eyes
Small amount of black cotton crochet thread size 10
Bright Pink Fabric Dye or Pigment or Pure Pigment Blush
Q-Tip or other Applicator
Tapestry Needle
Sewing Needle
Stitch Marker
Polyfil Fiber Stuffing
Scissors

Stitch Legend:
Ch – Chain
Mgc Rng – Magic Ring
SC – Single Crochet
SC2Tog – Single Crochet Decrease
Sl St – Slip Stitch
St – Stitch
Sts - Stitches
* – Repeat instructions from *
Gauge & Finished measurements: 4 Stitches or 5 rounds in 1 inch. Finished measurement is about 2” tall.

NOTE: Please note that the pattern is worked in a spiral & not joined. Use a Stitch Marker to mark the last St in the round & continue on to the next round of instructions.

CAMPFIRE THE MINI MARSHMALLOW

Round 1: Begin with a Mgc Rng & 6 SC into the ring, pull yarn tail closed & continue on to the next round’s instructions (6 SC)

Round 2: 2 SC in each St around (12 SC)

Round 3: *2 SC in next St, 1 SC in next St, Repeat from * around (18 SC)

Round 4: *2 SC in next St, 1 SC in next 2 Sts, Repeat from * around (24 SC), Sl St into next St

Round 5: Working in the Back Loops Only of each St, 1 SC into each St around (24 SC)

Rounds 6-14: Working in Both Loops of each St, 1 SC into each St around (24 SC) At the end of Round 14 Sl St into the next St & pull up a long loop & remove hook

MOUTH & EYES


With black thread Embroider Mouth Detail using a running stitch in a bow shape centered over Rounds 8 & 9. Weave in ends at back of piece to secure.

Attach Safety Eyes in Round 11 starting spaced 2 Sts over from the end of the mouth, Sk 4 Sts & attach 2nd Eye in same Round. Reattach hook & continue on to Round 15

Round 15: Working in the Back Loops Only of each St, *1 SC into the next 2 Sts, SC2Tog, Repeat from * around (18 SC) Stuff your piece here. (Be careful not to over stuff your piece as you want it to maintain the cylindrical shape.)

Round 16: Working in Both Loops of each St, *1 SC into the next St, SC2Tog, Repeat from * around (12 SC)

Round 17: *SC2Tog, Repeat around, (6 SC), Sl St into the next St, Ch 1 & Fasten off leaving a longer tail for sewing, Stitch top closed & weave in your yarn tail to secure & cut excess yarn.


CHEEKS
Apply Cheek pigment of choice to cheek area under eye & to the sides of mouth on both sides. Let dry completely before allowing children to play with toy.


© Copyright Michelle R. Kovach/The Perfect Knot 2012 - 2014. All rights reserved. This is my original pattern. Do Not Copy, Modify, Reproduce, Sell or Claim as your own. You may sell items made from this pattern, but please Do NOT claim it as your own unique design. Please refer back to me as the original designer for any items you may sell. http://www.facebook.com/ThePerfectKnotCrochet

Lightning Bolt Amigurumi Throwing Toy By The Perfect Knot

Lightning Bolt Throwing Toy Amigurumi by The Perfect Knot
This is just a cute little toy for your kids or your pets to play with.
Nothing too shocking, just a little soft lightning stuffie to play with.
Make one or make a bunch & create your own little Storm of fun!
Pattern works up in about 30-45 minutes & can be played with for all ages.
Thanks for Stopping by The Perfect Knot Crochet and More!

Lightning Bolt Amigurumi Throwing Toy

This is an Intermediate level pattern written in US Crochet Terms.

Materials Needed:
Size 4.0mm Crochet Hook
Size 4 Worsted Weight Yarn
Tapestry Needle
Scissors
Polyfil Stuffing

Stitch Legend:
Ch – Chain
SC – Single Crochet
Sl St – Slip Stitch
St – Stitch
Sts – Stitches
SC2Tog – Single Crochet invisible decrease


LIGHTNING BOLT - MAKE 2

Row 1: Ch 8, 1 SC in 2nd Ch from hook & into each Ch across (7 SC)

Rows 2 – 5: Ch 1 & turn, 1 SC into each St across (7 SC)

Row 6: Ch 5, 1 SC in 2nd Ch from hook & into next 4 Ch, 1 SC into next 7 Sts (11 SC)

Rows 7 – 9: Ch 1 & turn, 1 SC into each St across (11 SC)

Rows 10 - 13: Ch 1 & turn, 1 SC into the next 7 Sts (7 SC)

Row 14: Ch 5, 1 SC in 2nd Ch from hook & into the next 4 Ch, 1 SC into the next 3 Sts (7 SC)

Rows 15 - 16: Ch 1 & turn, 1 SC into each St across (7 SC)

Row 17: Ch 1 & turn, Sl St into the next 4 Sts, 1 SC into the next 3 Sts (3 SC)

Row 18: Ch 1 & turn, 1 SC into the next 3 Sts, (3 SC)

Row 19: Ch 1 & turn, SC2Tog, 1 SC in next St (2 SC)

Row 20: Ch 1 & turn, SC2Tog (1 SC), Ch 1 & Fasten off. Weave in ends on 1st piece. 

DO NOT FASTEN OFF SECOND PIECE & leave a longer tail for sewing, match pieces together after completing second piece & stitch piece up & stuff before stitching completely closed. Weave in remaining ends & cut excess yarn.

© Copyright Michelle R. Kovach/The Perfect Knot 2012 - 2014. All rights reserved. This is my original pattern. Do Not Copy, Modify, Reproduce, Sell or Claim as your own. You may sell items made from this pattern, but please Do NOT claim it as your own unique design. Please refer back to me as the original designer for any items you may sell. http://www.facebook.com/ThePerfectKnotCrochet

Mad Pig Amigurumi Pattern by The Perfect Knot

Mad Pig Amigurumi by The Perfect Knot

Meet the Mad Pig!
My little nephew came to visit & asked me to create him a Mad Pig since he’s a bit obsessed with this game. :)
He said he needed to be “green, have little eyes, the mad smirk & a crown”. So of course being the Auntie who loves this little guy, I had to oblige him & make him the Mad Pig. ;)
I hope you will enjoy making your own Mad Pig too!
Thanks for stopping by The Perfect Knot Crochet and More!

This is an Intermediate level pattern written in US Crochet terms.

Materials needed:
Size 4.0mm Crochet hook
Green, White, Black & Yellow Size 4 Worsted Weight Yarn
Tapestry needle
Stitch Marker
6.0mm Safety Eyes (2)

Stitch Legend:
Ch – Chain
Mgc Rng – Magic Ring
SC – Single Crochet
HDC – Half Double Crochet
DC – Double Crochet
SC2Tog – Single Crochet Decrease
Sl St – Slip Stitch
St – Stitch
Sts – Stitches
* – Repeat from *
FO – Fasten Off

TUTORIAL
If you need help with top-stitching, you can find this tutorial on my blog.

EYES – Make 2


Round 1:  With White yarn & a Mgc Rng, Ch 2 (counts as 1st HDC), 7 HDC into ring, pull yarn tail to close, Sl St to 1st HDC to join (8 HDC)
Round 2: Ch 1, 1 SC into each St around, Sl St to 1st SC to join, Ch 1 & FO leaving a longer tail for sewing (8 SC)
Weave in your beginning yarn tails & set aside for later.

PIG HEAD
NOTE – Pig head is worked in a spiral & not joined. Attach Stitch Marker into last St of each round & continue to next round. Use the beginning start of the Pig head as the top & stitch on your parts with the beginning Mgc Rng oriented at the top of the piece.

Round 1: Begin with Green yarn & a Mgc Rng, 6 SC into ring, pull yarn tail to close, (6 SC)

Round 2: *2 SC into each St around (12 SC)

Round 3: *1 SC into next St, 2 SC in next St, Repeat around (18 SC)

Round 4: *1 SC into the next 2 Sts, 2 SC in next St, Repeat around (24 SC)

Round 5: *1 SC into next 3 Sts, 2 SC into next St, Repeat around (30 SC)

Round 6: *1 SC into next 4 Sts, 2 SC into next St, Repeat around (36 SC)

Rounds 7 – 11: 1 SC into each St around (36 SC)

Round 12: *1 SC into next 4 Sts, SC2Tog into next St, Repeat around (30 SC)

Round 13: 1 SC into each St around (30 SC)

Round 14*1 SC into next 3 Sts, SC2Tog into next St, Repeat around (24 SC)

Round 15: 1 SC into each St around (24 SC)

Round 16: *1 SC into next 2 Sts, SC2Tog into next St, Repeat around, pull up a long loop & remove hook, continue to Snout piece (18 SC)


SNOUT – Make 1


Round 1: Begin with Green Yarn & a Mgc Rng, Ch 3, 15 DC into ring, pull yarn tail to close & Sl St to top of beginning Ch 3 to join (16 DC)

Round 2: Sl St into the BACK LOOP of the next St, Working in BACK LOOPS ONLY of each St, Ch 1, 1 SC into the same St, 1 SC into each St around, Sl St to 1st SC to join (16 SC)

Round 3: Working through both loops of the St, Ch 1, 1 SC into same St, 1 SC into each St around, Sl St to 1st SC to join, Ch 1 & FO leaving a longer tail for sewing. (16 SC)

Weave in starting yarn ends & cut excess yarn.


NOSTRILS
Using Black yarn, embroider 2 vertical stitches in the center of the nose for nostril detail using 4 wraps of the stitch. Weave in starting yarn tails & embroidery yarn to the inside of the Snout.

Top Stitch 1St Eye to the side of the head & insert Safety eye into Eye. Weave in your ends at the back side of the head & cut excess yarn.

Stuff Snout with a small amount of Polyfil & attach snout to center of Pig Head, rotate the snout so that the nostrils have one slightly higher than the other & using a top whip stitching method only catching the top loops of the Stitches next to the 1st Eye. Weave in your ends at the back side of the head & cut excess yarn.

Top Stitch 2nd Eye to the side of the head & insert Safety eye into Eye. Weave in your ends at the back side of the head & cut excess yarn.


MOUTH DETAIL


Using Black yarn embroider a sort of crooked smirk of a smile to the side & just below the Snout. Weave in ends to the inside of the head.

Reattach hook to Pig Head & Stuff Pig Head Here

PIG HEAD CONTINUED

Round 17: *1 SC into next St, SC2Tog into next St, Repeat around, (12 SC)

Round 18: *SC2Tog, Repeat around, Sl St into next St, Ch 1 & FO leaving a longer tail for sewing, Stitch closed using the tapestry needle & weave in all ends. (6 SC)


CROWN


Begin: With Yellow yarn, leaving a longer starting tail for sewing, Ch 8, Sl St to 1st Ch to join

Rounds 1 – 3: Ch 1, SC into each Ch around, Sl St to 1st SC to join (8 SC)

Round 4: Ch 4 (Counts as 1st HDC & Ch 2), HDC in same St, Sl St into next St, *[HDC, Ch 2, HDC] in next St, Sl St into next St, Repeat around, Sl St into 1st Ch of beginning Ch 4 to join, Ch 1 & FO (8 HDC)
Weave in ending yarn tail & use beginning yarn tail to Top Stitch the crown to the head angled over the Right Eye.

EAR – Make 1 or 2

NOTE – Ears are worked in a spiral & not joined. Attach Stitch Marker into last St of each round & continue to next round.

Round 1:  With Green yarn & a Mgc Ring, 6 SC into ring, pull yarn tail to close (6 SC)

Round 2: *2 SC into each St around (12 SC)

Rounds 3 – 5: *SC into each St around (12 SC) At the end of Round 5, Sl St into the next St, Ch 1 & FO leaving a long tail for sewing. Weave in the beginning yarn tail, pinch Ear closed in the center & whip stitch it shut at the bottom. Pinch bottom of each into a “C” shape & stitch the two sides at the bottom together. Set the ear on the head at an angle over the Left Eye & Top Stitch around the bottom of the ear to secure it to the head, weave in your ends & cut excess yarn.

If you make 2 Ears set the 2nd Ear closer to the crown & top stitch it on.

© Copyright Michelle R. Kovach/The Perfect Knot 2012 - 2014. All rights reserved. All content & images in this pattern are protected under international copyright laws. This is my original pattern. Do Not Copy, Modify, Reproduce, Redistribute, Sell or Claim as your own. You may sell items made from this pattern, but please Do NOT claim it as your own unique design. Please refer back to me as the original designer for any items you may sell. http://www.facebook.com/ThePerfectKnotCrochet


Hissy Snake Amigurumi Pattern

Hissy Snake Amigurumi by The Perfect Knot

Meet the Hissy Snake!
This little guy came about because my niece came for a visit & asked me to make her a “Wainbowed Snake, wif a tongue & eyes. This long
--------------“, as she held out her little hands to show me just exactly how long he should be.
How could I say no to such cuteness? She is a sweet little 4 year old after all who loves her auntie & who’s auntie loves her. ;)
And so the Hissy Snake was born & when she got him, she was Thrilled to pieces & was loving on him & twirling him around & playing with him the whole time. :) Made this auntie happy just to see it.
I hope you & all your little snake lovers will enjoy making him too.

Hissy Snake Amigurumi Pattern
This is an Intermediate level pattern written in US Crochet Terms.
Materials Needed:                                                                                                            
Size 4.0mm Crochet Hook
Worsted Weight Yarn in 2 colors
6.0mm Safety Eyes
Tapestry Needle
Scissors
Stitch Markers
Polyfil Fiber Stuffing

Stitch Legend:
Ch – Chain
Mgc Rng – Magic Ring
SC – Single Crochet
SC2Tog – Single Crochet Decrease
Sl St – Slip Stitch
St – Stitch
Sts – Stitches
* – Repeat from *
FO – Fasten Off


HISSY THE SNAKE
Hissy The Snake


NOTE – Pattern is worked in a spiral & not joined. Attach St marker in the last St of each round & continue on to the next rounds directions.

Round 1: Begin with a Mgc Rng, 6 SC into ring, pull yarn tail to close (6 SC)

Round 2:  *2 SC into next St, Repeat around (12 SC)

Rounds 3 – 5: 1 SC into each St around (12 SC)

Round 6: *2 SC into next St, Repeat around (24 SC)

Rounds 7 – 9: 1 SC into each St around (24 SC)

Round 10: *1 SC into next 2 Sts, SC2Tog into next St, Repeat around (18 SC)

Round 11: 1 SC into each St around (18 SC)

Insert Safety Eyes at Round 9, set them 6 Sts apart from each other.


Stuff head here with a small amount of Stuffing


Round 12: *SC into next St, SC2Tog, Repeat around (12 SC)

Round 13: 1 SC into each St around (12 SC)

Round 14: *1 SC into next 3 Sts, 2 SC in next St, Repeat around (15 SC)

Rounds 15 – Desired Length: 1 SC into each St around (15 SC)

Add a small amount of Stuffing about every 5-10 rounds as you build. I used about a cotton ball’s size amount of stuffing for each time I stuffed the length of the body. Remember not to over stuff the piece as you want it to still remain flexible & move like a Snake would.


DECREASE ROUNDS

Decrease Round 1: *1 SC into next 3 Sts, SC2Tog, Repeat around (12 SC)

Next 3 Rounds: 1 SC into each St around (12 SC)

Decrease Round 2: * 1 SC into next 2 Sts, SC2Tog, Repeat around (9 SC)

Next 3 Rounds: 1 SC into each St around (9 SC)

Finish stuffing your piece here

Decrease Round 3: *SC into next St, SC2Tog, Repeat around (6 SC)

Final Round: 1 SC into each St around, Sl St into next St after last SC, Ch 1 & FO leaving a longer tail to sew end closed. (6 SC)

Using the Tapestry needle, stitch the end of the snake closed & weave in your end to secure.


TONGUE
With Pink or Red yarn, Ch 8, Sl St into 6th Ch from hook, Ch 5, Sl St into same Ch as last Sl St, Sl St into next 2 Ch, Ch 1 & FO leaving a longer tail for sewing.

Weave in your beginning yarn tail & stitch the tongue to the front of the snake’s head where the tongue should be. Weave in all ends to secure & cut excess yarn.


© Copyright Michelle R. Kovach/The Perfect Knot 2012 - 2014. All rights reserved. All content & images in this pattern are protected under international copyright laws. This is my original pattern. Do Not Copy, Modify, Reproduce, Redistribute, Sell or Claim as your own. You may sell items made from this pattern, but please Do NOT claim it as your own unique design. Please refer back to me as the original designer for any items you may sell. http://www.facebook.com/ThePerfectKnotCrochet