Thursday, May 1, 2014

Hissy Snake Amigurumi Pattern

Hissy Snake Amigurumi by The Perfect Knot

Meet the Hissy Snake!
This little guy came about because my niece came for a visit & asked me to make her a “Wainbowed Snake, wif a tongue & eyes. This long
--------------“, as she held out her little hands to show me just exactly how long he should be.
How could I say no to such cuteness? She is a sweet little 4 year old after all who loves her auntie & who’s auntie loves her. ;)
And so the Hissy Snake was born & when she got him, she was Thrilled to pieces & was loving on him & twirling him around & playing with him the whole time. :) Made this auntie happy just to see it.
I hope you & all your little snake lovers will enjoy making him too.

Hissy Snake Amigurumi Pattern
This is an Intermediate level pattern written in US Crochet Terms.
Materials Needed:                                                                                                            
Size 4.0mm Crochet Hook
Worsted Weight Yarn in 2 colors
6.0mm Safety Eyes
Tapestry Needle
Scissors
Stitch Markers
Polyfil Fiber Stuffing

Stitch Legend:
Ch – Chain
Mgc Rng – Magic Ring
SC – Single Crochet
SC2Tog – Single Crochet Decrease
Sl St – Slip Stitch
St – Stitch
Sts – Stitches
* – Repeat from *
FO – Fasten Off


HISSY THE SNAKE
Hissy The Snake


NOTE – Pattern is worked in a spiral & not joined. Attach St marker in the last St of each round & continue on to the next rounds directions.

Round 1: Begin with a Mgc Rng, 6 SC into ring, pull yarn tail to close (6 SC)

Round 2:  *2 SC into next St, Repeat around (12 SC)

Rounds 3 – 5: 1 SC into each St around (12 SC)

Round 6: *2 SC into next St, Repeat around (24 SC)

Rounds 7 – 9: 1 SC into each St around (24 SC)

Round 10: *1 SC into next 2 Sts, SC2Tog into next St, Repeat around (18 SC)

Round 11: 1 SC into each St around (18 SC)

Insert Safety Eyes at Round 9, set them 6 Sts apart from each other.


Stuff head here with a small amount of Stuffing


Round 12: *SC into next St, SC2Tog, Repeat around (12 SC)

Round 13: 1 SC into each St around (12 SC)

Round 14: *1 SC into next 3 Sts, 2 SC in next St, Repeat around (15 SC)

Rounds 15 – Desired Length: 1 SC into each St around (15 SC)

Add a small amount of Stuffing about every 5-10 rounds as you build. I used about a cotton ball’s size amount of stuffing for each time I stuffed the length of the body. Remember not to over stuff the piece as you want it to still remain flexible & move like a Snake would.


DECREASE ROUNDS

Decrease Round 1: *1 SC into next 3 Sts, SC2Tog, Repeat around (12 SC)

Next 3 Rounds: 1 SC into each St around (12 SC)

Decrease Round 2: * 1 SC into next 2 Sts, SC2Tog, Repeat around (9 SC)

Next 3 Rounds: 1 SC into each St around (9 SC)

Finish stuffing your piece here

Decrease Round 3: *SC into next St, SC2Tog, Repeat around (6 SC)

Final Round: 1 SC into each St around, Sl St into next St after last SC, Ch 1 & FO leaving a longer tail to sew end closed. (6 SC)

Using the Tapestry needle, stitch the end of the snake closed & weave in your end to secure.


TONGUE
With Pink or Red yarn, Ch 8, Sl St into 6th Ch from hook, Ch 5, Sl St into same Ch as last Sl St, Sl St into next 2 Ch, Ch 1 & FO leaving a longer tail for sewing.

Weave in your beginning yarn tail & stitch the tongue to the front of the snake’s head where the tongue should be. Weave in all ends to secure & cut excess yarn.


© Copyright Michelle R. Kovach/The Perfect Knot 2012 - 2014. All rights reserved. All content & images in this pattern are protected under international copyright laws. This is my original pattern. Do Not Copy, Modify, Reproduce, Redistribute, Sell or Claim as your own. You may sell items made from this pattern, but please Do NOT claim it as your own unique design. Please refer back to me as the original designer for any items you may sell. http://www.facebook.com/ThePerfectKnotCrochet

Wednesday, April 30, 2014

Angel Wings Crochet Pattern by The Perfect Knot


Angel Wings Applique by The Perfect Knot

Angel Wings Applique
These pretty little Angel wings are a great add-on applique to any project you may think may need a little bit of Heaven!
Add them to your favorite projects for squares, t-shirts, blankets, stuffed toys or anything else you can think of for their use.


Angel Wings Applique

This is an intermediate level pattern written in US Crochet terms.

Materials Needed:
Small amount of worsted weight yarn
Size 3.75mm crochet hook
Tapestry Needle
Scissors

Stitch Legend:
Ch – Chain
SC – Single Crochet
HDC – Half Double Crochet
Sl St – Slip Stitch
Sk – Skip
St – Stitch
Sts – Stitches
FO – Fasten Off

Finished Wing measures 4” long by 1.75” wide.

NOTE: If you catch the back loops of the Stitches in the round below as shown in the photo your wings will be reversible


WING – Make 2 & turn one oriented right & one oriented left

Round 1: Ch 13, SC in 2nd Ch from hook & into next 10 Ch, 5 SC in last Ch, working into bottom of Ch, SC into next 9 Ch, (25 SC)

Round 2: Ch 1 & turn, SC into next 11 Sts, 3 SC in next St, SC into next 13 Sts (27 SC)

Round 3: Ch 1 & turn, Sk 1st SC, Sl St into next St, SC into next 11 Sts, 3 HDC into each of the next 3 Sts, SC into next 8 Sts, Sl St into next St (28 Sts)

Round 4: Ch 1 & turn, Sk Sl St, Sl St into next St, SC into next 10 Sts, 2 HDC into each of the next 4 Sts, SC into the next 12 Sts, Sl St into next 3 Sts to point of wing, Ch 1 & FO (30 Sts)
Weave in all ends with the tapestry needle to secure & cut excess yarn.
© Copyright Michelle R. Kovach/The Perfect Knot 2012-2014. All rights reserved. All content & images in this pattern are protected under international copyright laws. This is my original pattern. Do Not Copy, Modify, Reproduce, Redistribute, Sell or Claim as your own. You may sell items made from this pattern, but please Do NOT claim it as your own unique design. Please refer back to me as the original designer for any items you may sell. http://www.facebook.com/ThePerfectKnotCrochet

Sunday, April 27, 2014

Candy Applique Pattern

Candy Applique by The Perfect Knot

These sweet little treats are a great addition to your favorite projects. Add them to squares, blankets, shirts or anything else you want to sweeten up!
Use a larger hook for a bigger applique.
Make one or make a ton in your favorite colors. You can use them as sweet little treats for the little ones as rewards, or stitch a bunch together to make a garland or other decoration.

Candy Applique Pattern

This is an Intermediate level pattern written in US crochet terms.

Materials Needed:
Size 4.5mm Crochet Hook
Size 4 Worsted weight yarn in 3 colors
Stitch Marker
Tapestry Needle
Scissors

Stitch Legend:
Mgc Rng – Magic Ring
Ch – Chain
SC – Single Crochet
Sl St – Slip Stitch
Trbl – Treble Crochet
FO – Fasten off
St – Stitch
Sts - Stitches
* – Repeat instructions from *
[ ] – Stitches worked into the same Space or Stitch

NOTE – Pattern is worked in a Spiral & not joined. You will be crocheting over & carrying your yarn as you continue around & switching colors every other round. Use a Stitch Marker at the end of each round & continue on to the next round’s directions.

Round 1: Begin with a Mgc Rng & Color A, 6 SC into ring, Change to color B on the last half of the 6th SC, pull yarn tail to close & continue to Round 2 (6 SC)

Round 2: With Color B, *2 SC into next St, Repeat around & Change back to Color A on the last half of the last SC (12 SC)

Round 3: With Color A, *SC into next St, 2 SC in next St, Repeat around & switch to Color B on the last half of the last SC (Cut Color A leaving a longer tail to weave in your ends)  (18 SC)

Round 4: With Color B, *SC into each of the next 2 Sts, 2 SC into next St, Repeat around, Sl St into next St, Ch 1 & FO (24 SC)

Weave in your tails for the spiral part of the piece.

WRAPPER
In Same St as last FO Attach White yarn with a Sl St, [Ch 4 (Counts as 1st Trbl), 4 Trbl into same Space, Ch 4 & Sl St back into same St], Ch 1 & FO

Count 12 Sts around one side or the other & attach white yarn on the opposite side & repeat instructions above for 2nd side of Wrapper.

Weave in all tails & cut excess yarn to secure.


© Copyright Michelle R. Kovach/The Perfect Knot 2013. All rights reserved. All content & images in this pattern are protected under international copyright laws. This is my original pattern. Do Not Copy, Modify, Reproduce, Redistribute, Sell or Claim as your own. You may sell items made from this pattern, but please Do NOT claim it as your own unique design. Please refer back to me as the original designer for any items you may sell. http://www.facebook.com/ThePerfectKnotCrochet

Friday, April 25, 2014

The Perfect Knot Turns 2!

The Perfect Knot Turns 2 Dollar Days Sale!

Holy Smokes! Where does the time go?
I swear it wasn't but more than a couple of weeks ago that I was writing a post saying that The Perfect Knot was turning 1!

Well now here we are & it's a WHOLE YEAR later & TPK is celebrating another year! 2 YEARS OLD! Wooo Hooo!
Hard to believe that we're already here. :)


Anyway to celebrate The Perfect Knot's 2nd Anniversary, I am doing something I have never done before & I am marking down all individual patterns in my Ravelry Shop to just $1 until 4-28-14!

I've had so much fun with this tangled journey & I so enjoy all of your friendships, love and support!

Thank you all so much for making The Perfect Knot a fun & colorful place!

All the best,

Michelle K
The Perfect Knot Crochet and More


Wednesday, April 16, 2014

Bunny Head Applique from The Perfect Knot

Bunny Head Applique by The Perfect Knot

With spring & Easter upon us, I thought I would make a cute little spring bunny for everyone to play with!
He's a great little embellishment to all your favorite Spring/Easter type projects!

I have included the pattern here for everyone to enjoy!


Bunny Head Applique

This is an Intermediate level pattern written in US Crochet Terms.

Materials Needed:
Worsted weight yarn in 3 colors (I used Red Heart With Love & Red Heart Super Saver in my example.)
Size 4.0mm crochet hook
Tapestry Needle
Scissors

Stitch Legend:
Ch – Chain                                          SC – Single Crochet
Sl St – Slip Stitch                                 SC3Tog – Single Crochet 3 Stitches Together (Decrease)
St – Stitch                                            Sts – Stitches
FO – Fasten Off                                 FLO – Front Loops Only
RS – Right Side                                   WS – Wrong Side
* – Repeat Instructions from *                        YO – Yarn Over

Special Stitch:
Puff Stitch (Puff) – Yarn over, insert hook into designated stitch or chain, pull up a loop, repeat process until you have 9 loops on the hook. (The Puff Stitch will be the nose of the bunny.)

Special Skills Required:
For this tutorial you will need to know how to do short & long stitch embroidery for the details of the facial features of the Bunny.
You will also need to know how to Top Stitch your applique to your project. I have created a tutorial for this technique on my blog which can be found here: http://theperfectknotcrochetandmore.blogspot.com/2013/08/top-stitching-photo-tutorial-and-goggle.html

Finished Measurements: 4” tall x 2 ½” wide

Gauge: 6 Sts in 1” in the round.

BUNNY APPLIQUE

NOSE
Round 1: Begin with Pink yarn, Ch 3, Puff St in 3rd Ch from hook, Ch 3, Sl St to bottom of Puff to join, Ch 1 & FO Pink yarn (1 Puff St)

HEAD

Round 2: Working in FLO of Ch around Puff, Attach white yarn with a Sl St into the same St as last FO in the bottom of the Puff St, Ch 1, 2 SC into same St, SC in next Ch, 2 SC in next Ch, SC in next Ch, 2 SC in top of Puff St, SC in next Ch, 2 SC in next Ch, SC in next Ch, Sl St through Both Loops of 1st SC to join (12 SC)

Round 3: Working through both loops of the Sts, Ch 1, 2 SC in same St, *2 SC in next St, Repeat from * around & Sl St to 1st SC to join (24 SC)

Round 4: Ch 1, SC in same St, 2 SC in next St, *SC in next St, 2 SC in next St, Repeat from * around & Sl St to 1st SC to join (36 SC)

EAR #1 – Switching to Rows now

Row 1: Sl St into next 2 Sts, Ch 1 & turn, SC in same St as last Sl St, SC into next 2 Sts (3 SC)

Row 2: Ch 1 & turn, SC into each St across (3 SC)

Rows 3 – 5:  Repeat Row 2 (3 SC)

Row 6: RS facing you, SC3Tog, Ch 1 (1 SC), Working along the side of Ear Sl St to the bottom of the Ear, Sl St into next St on head

EAR #2

Row 1: SC into next 3 Sts (3 SC)

Row 2:  Ch 1 & turn, SC into each St across (3 SC)

Rows 3 – 5:  Repeat Row 2 (3 SC)

Row 6: WS facing you, SC3Tog, Ch 1, Working along the inside of the Ear towards the head, Sl St to the top of the head, Sl St into the Sl St between the Ears, Ch 1 & FO leaving a long tail for sewing on your applique to your project later (36 – 48”).

Using the tapestry needle weave in all your ends except for your sewing end to secure. Embroider eyes & mouth detail using black yarn & the tapestry needle. Weave in your ends from your embroidery yarn & Top Stitch your applique to your project.

Bunny Head Applique by The Perfect Knot

Bunny Head Applique by The Perfect Knot

© Copyright Michelle R. Kovach/The Perfect Knot 2012 - 2014. All rights reserved. All content & images in this pattern are protected under federal & international copyright laws. This is my original pattern. Do Not Copy, Modify, Reproduce, Redistribute, Sell or Claim as your own. You may sell items made from this pattern, but please Do NOT claim it as your own unique design. Please refer back to me as the original designer for any items you may sell. http://www.facebook.com/ThePerfectKnotCrochet

Enjoy & Happy Crocheting!

Michelle K
The Perfect Knot

Thursday, April 3, 2014

The Latest & Greatest! New Patterns Round-up

It's been a while since I've had a chance to write a blog post.
I just wanted to give you all a quick update of all the latest & greatest new patterns available from The Perfect Knot!

First up is the Felicity Flapper Cloche! It's a beautiful little convertible flapper style cloche that can be worn several different ways.


Next up is the Arianna's Lace Square. It's a pretty little lacy looking square that can be added to all your favorite afghans or squares projects.


Followed by the lovely Vestured Scarf with it's matching Vestured Hat. This is a great DK weight hat & scarf perfect for the warmer spring weather, but still comfortable in those cooler nights.


And I certainly can't forget my Knitter Friends! A great Basket Weave Hat with a wonderful texture in a great pattern that works up really quickly!


With Spring right around the corner we have a couple pretty little flower squares! The MaKenzie's Blossom Square & the Rose in Full Bloom Square.


And last but not least a Rainbow to brighten up any day!


All of these great new patterns are available for sale in my Ravelry Shop & on sale 50% off until 4-7-14!


Thanks for stopping by The Perfect Knot Crochet and More!

Have a great day!

Michelle K

Thursday, January 2, 2014

Why do I make squares?


I know many of you have found me through my Facebook page & you all often comment on the pictures I share with you. I so Love that! It makes it even more fun for me to share what I have created with all of you. And I love it even more when I receive a lovely message from someone regarding something I posted.

The other day I was asked "Why do you make squares for this project?" & I really sat down & thought about it for quite some time before I answered because it is both simple and complex at the same time as to WHY I do it. I wanted to take the time to expand a little bit about that here.

I know I recently shared with you all about the Join The Love Ministry in this post; and as I mentioned before, this ministry is very personal to me. A few years ago I went through my own series of losses & I think if I had the type of comfort, love & support that we try to provide through the Join the Love ministry, it would have helped me immensely instead of me struggling through it on my own in such a dark place.

We receive the most heartfelt requests on the Join the Love page from the most amazing, strong, loving families that can only hope & pray for just a little piece of their child back. With our blankets, we try our best to give them something that is filled with things they loved about their child or that their child loved & was so personal to them. Each request comes with specific colors and themes that remind them of the child, or things that they would like incorporated into the squares.

Each one of our blankets is completely unique just like their child was. Each square is filled with love, hope & compassion that we wish to pour out on the families nominated. Each square is just a small piece of something beautiful that comes together in the end to make a much larger whole.

So to answer the question "Why do I make squares?", the answer is simple: "Out of Love". I donate my squares because it all becomes something far bigger than myself. My one or two little squares get added to 56 other squares to make it one beautiful piece that gets given away & shared. It becomes Love that can be shared then with every person in that person's family or circle. It becomes peace, comfort & healing to a broken family going through such a difficult time in their lives, that unless you have been through it, you cannot even begin to understand it. We try our best to make each blanket created like a big giant hug for the family receiving it.

So for me to donate my time, my yarn, my heart & my love to make something beautiful for someone else, it just makes sense to me! It's all a part of something bigger, something un-explainable in the sense of why I do it, but yet I love doing it. It allows me to give back just a little piece of something that cannot be replaced.

My 15-60 minutes of time spent making my squares or my few yards of yarn, are never as priceless or as precious as the final gift that is given to the families receiving that blankets. It brings me so much joy & happiness to be able to love on them in this way. To some it may just be one small 6" square, but to those that receive these blankets, it becomes something so much more. Something so indescribable that there are often no words for the love, gratitude & appreciation they feel when they receive the blankets.

So if you really & truly want to know as to "Why I make squares?", I encourage you to try it just once. See what it's like to give back to families like this & to experience for yourself the joy you feel when you get to hear back on your own from one of the families who are gifted our blankets & to see how happy they are to receive them. It's an amazing feeling and something far beyond words can express!

All it takes is one square for you to help! If you want to help let us know at https://www.facebook.com/JointheLove.page

Have a great day!

Michelle K
The Perfect Knot Crochet and More

Monday, December 16, 2013

Simple Says It Best!

Simple Says It Best Square

SIMPLE SAYS IT BEST

I needed a really quick and easy closed weave square for some appliques and to use as solid color fillers in a blanket project.

I looked and looked and couldn't find exactly what I needed or wanted; so me being me and the designer that I am, I of course opted to make my own.
And of course I thought of all my Tangled Friends would probably like this pattern too, so I have written it out and am posting it here for all of you!

So without any further ado ... Drum roll please....

The Simple Says It Best 6 Inch Square! Ta da!


Simple Says It Best Square

This is an Intermediate level pattern written in US Crochet Terms.

Materials Needed:

Size 5.0mm Crochet Hook
Worsted Weight Yarn
Tapestry Needle
Scissors
Tape Measure

Stitch Legend:

Mgc Rng – Magic Ring
Ch – Chain
SC – Single Crochet
DC – Double Crochet
Sl St – Slip Stitch
St – Stitch
Sts – Stitches
* – Repeat Instructions between *’s
FO – Fasten Off
[ ] – Stitches worked in same Space or Stitch

Round 1: Begin with a Mgc Rng, Ch 3 (counts as 1st DC here & throughout), 15 DC into the ring, pull yarn tail to close & Sl St to top of Ch 3 to join (16 DC)

Round 2: [Ch 3, 1 DC, Ch 2, 2 DC] (corner made) into the same St as joining, *1 DC in next 3 Sts, [2 DC, Ch 2, 2 DC] in next St, Repeat from * around omitting last corner instructions, Sl St to top of Ch 3 to join (28 DC)

Round 3: Sl St into next St & into Ch 2 space, [Ch 3, 1 DC, Ch 2, 2 DC], *1 DC into each St across to corner, in Ch 2 corner space [2 DC, Ch 2, 2 DC], Repeat from * around omitting last corner instructions, Sl St to top of Ch 3 to join (44 DC)

Rounds 4 & 5: Repeat Round 3, after last Sl St on Round 5, Ch 1 & FO (Round 4 Count 60 DC, Round 5 Count (76 DC)

Using the tapestry needle, weave in all ends to secure & cut excess yarn.

Enjoy!

© Copyright Michelle R. Kovach/The Perfect Knot 2013. All rights reserved. All content & images in this pattern are protected under international copyright laws. This is my original pattern. Do Not Copy, Modify, Reproduce, Redistribute, Sell or Claim as your own. You may sell items made from this pattern, but please Do NOT claim it as your own unique design. Please refer back to me as the original designer for any items you may sell. http://www.facebook.com/ThePerfectKnotCrochet


Thursday, November 28, 2013

Happy Thanksgiving!


As many of you celebrate today with friends and family, enjoying wonderful food and fun.; I just wanted to take a moment to wish you all a Happy Thanksgiving and to say Thank you all for being a part of The Perfect Knot Crochet and More.

I am grateful to all who support me in this adventure and who encourage me to continue it.

It is a wonderful blessing to me and I am truly grateful to be able to share my creative outlet with all of you!

I am blessed with wonderful family and friends who enjoy and love what I do and who make my life extra special through this business! I am truly thankful for all of them and for all of you who follow my fan page and my blog.

I hope you all will take a moment to reflect and count your blessings and realize just how truly blessed we all are. There is always something to be thankful for!

I give thanks with a Grateful Heart for all of you!

I wish you all a Happy Thanksgiving and a wonderful Holiday season.

Happy Thanksgiving!

Michelle K
The Perfect Knot

Monday, October 14, 2013

How To Weave In Your Ends in Crochet

Weaving Ends Tutorial


One of the things I get asked about a lot is how to finish your project when you are done crocheting.
So I have decided to put together a photo tutorial for you here.

The worst thing that can happen to anyone's hard work is to have it fall apart because your ends were not woven in securely. Just crocheting over the yarn or using your hook to pull back through your work is not enough. Your ends will work loose or come undone when you wash the items or use them.

When you weave in your ends, it is always best to use a tapestry needle & not a crochet hook because you can get a much more secure weave with the needle.

I always leave at least a 4-6" yarn tail whenever I add new yarn or whenever I cut my yarn so that I have plenty to work with & that I can make sure all my ends are securely woven in when I finish my project.

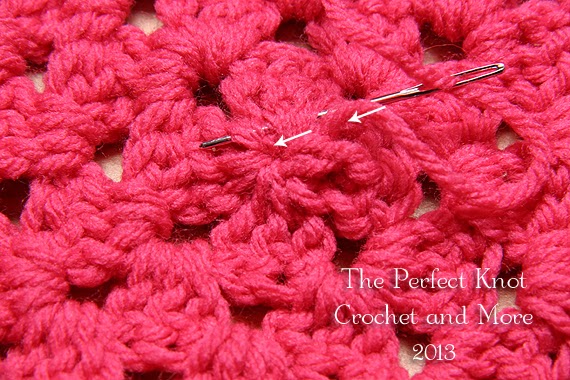
I have found that the most secure method of weaving my ends in is an over & under type method. If you go Over & under then back over & under you will find that this creates a locking type method securing the yarn or thread in between the stitches of your work. You can use this method for all of your crochet projects when weaving in your ends.

The above photo shows weaving for a Magic Circle or adjustable ring. If you have used one of these you know that they slide around & allow you to pull your stitches around the piece of yarn to pull it closed. In the same manner though, they can slide around & come undone. If your ends are not woven in correctly though, your ring will come loose & your project can unravel from the middle out. EEEEEEK! No one wants that!

So the best way I have found to secure the Magic Circle is to weave over & under all the way around the circle in one direction with the tapestry needle. Then to weave back the other way all the way around the circle doing the same method.
Weave over & under back the other direction
This will make the center more secure & your yarn will not come undone.

I also take it a step or two further when I weave these Magic Circles because I definitely don't want my work to come undone! I weave in both directions as well as through the center in both directions of my work.

Weave back around all the way around the ring again
Catch the stitch after where you pulled your needle out when
you change directions


Be sure to weave around & around & back through the center of the Magic Circle in order to get everything nice & secure.


You always want to catch the next stitch in your work from where you stopped & pulled your yarn needle through so that it makes a sort of little lock down to hold the yarn in place when you weave back the other direction.

This will help to secure the yarn from both sides & keep those tails in nice & tight!


Weave through the back loops of the Stitches so your
weaving will not show through on the front of your piece

Remember Crochet stitches are sort of like hollow little tubes & if you catch the back loops of the stitches while you are weaving, your weaving will not show through on the front side of your work.
Be sure not to push too hard or poke your yarn needle through the front side of your work when you are weaving in as you want the front to stay pretty.


Pull yarn tail through to secure all Stitches when done
weaving in your ends.

When you get done weaving in your work, be sure to pull your yarn tail through with the needle to secure all the ends & cut the excess yarn from your needle as close to the fabric as possible.


Finished project with ends woven in securely
When you are done weaving in your ends your finished project should be nice & neat on the back & the front & all of your ends should be tucked down nice & securely so that your finished project will not come undone. :)


I hope you find this tutorial helpful!

Thank you for stopping by The Perfect Knot Crochet and More!

Have a great day!

Michelle K
The Perfect Knot